📋Grand Marnier Cheesecake Recipe
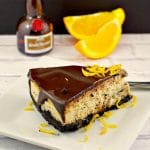
This baked Grand Marnier Cheesecake with Chocolate Glaze is a rich and delicious combination of milk chocolate, dark chocolate, orange and Grand Marnier liqueur on a chocolate Oreo crust.
Servings 12 people
Calories 336kcal
Ingredients
Crust:
- 2 cups Oreo cookie baking crumbs
- 3 tablespoon granulated sugar
- 7 tablespoon salted butter melted
Filling:
- 3 -8 oz -packages low fat cream cheese at room temperature
- 1 cup ricotta cheese
- 2 tablespoon all-purpose flour
- ¼ teaspoon salt
- 1 ¼ cups granulated sugar
- 3 ½ tablespoon Grand Marnier liqueur or equivalent amount (approx 1 tsp) Grand Marnier flavoring/extract * you can use the extract but be sure to use equivalent amount on the bottle (see Recipe NOTES)
- 2 teaspoon instant coffee powder
- ½ cup milk chocolate chips
- 1 tablespoon vanilla extract
- 4 whole large eggs at room temperature
Chocolate Glaze:
- 3 oz. semi-sweet bakers chocolate, chopped * NOT chocolate chips
- 5 tablespoon unsalted butter
- 1 tablespoon light corn syrup
Instructions
Oreo Crust:
- Position a rack in the center of the oven and heat the oven to 375 degrees F.
- In a medium bowl, stir together the oreo baking crumbs and granulated sugar. Mix in the melted butter until the crumbs are evenly moist and clump together slightly.
- Transfer the mixture to a 9-inch springform pan and press evenly onto the bottom and about 2 inches up the sides of the pan (to press, use plastic wrap or spatula). Bake 10 minutes. Let the pan cool on a rack.*** Lower the oven temperature to 300 degrees F.
Filling:
- In a stand mixer fitted with the paddle attachment, beat the cream cheese, ricotta, flour and salt on medium speed, scraping down the sides of the bowl and the paddle frequently, until very smooth and fluffy, about 5 minutes. Make sure the cheese has no lumps. Add the 1 ¼ cups granulated sugar and continue beating until well blended and smooth.
- Add the Grand Marnier, instant coffee, and chocolate chips and vanilla, and beat until blended, about 30 seconds. Add the eggs one at a time, beating just until blended. (Don't overbeat once the eggs have been added or the cheesecake will puff too much and crack as it cools.) Pour the filling into the cooled crust and smooth the top.
- Bake at 300 degrees F until the center jiggles like Jell-O when nudged, about 1 hr to 75 minutes. Bake in water bath or put pan of water underneath the baking cake (this creates moisture in the oven). The cake will be slightly puffed around the edges, and the center will still look moist. Set on a rack and cool completely.
- Cover and refrigerate until well chilled, at least 8 hours (preferably overnight) and up to 3 days. *Freezing: The cake can for be frozen at this point (prior to putting on chocolate glaze) for up to 1 month. To freeze, put the unmolded, cooled cake on a rimmed baking sheet in the freezer, uncovered, until the top is cold and firm; then wrap it in two layers of plastic and one layer of foil. Thaw overnight in the refrigerator when ready to eat, prior to glazing
Chocolate Glaze:
- In a small bowl, melt the 3 oz. chopped chocolate and the butter. Add the corn syrup and whisk until smooth. Unclasp and remove the side of the springform pan and run a long, thin metal spatula under the bottom crust of the cheesecake. Carefully slide the cake onto a flat serving plate. Pour the glaze on the cheesecake and spread evenly. Put in fridge for a few minute to set.
- To serve, run a thin knife under hot water, wipe it dry, and cut the cake into slices, heating and wiping the knife after every slice.
Notes
💭Top Tip
Cheesecake water bath
Although cheesecake is not hard to make, if you have one bad experience, it can turn you off ever making it again. And because baked cheesecake is prone to cracking, a water bath is often recommended. However, if you don't use a water bath and this cheesecake cracks, you can cover up the cracks with the glaze. Or alternatively, simply place a pan of warm water (filled to ⅔ full) on the rack underneath your cheesecake. This creates moisture in the oven, also helping to prevent cracking. I have used this trick many times and it works quite well.
🎥 Video
But if you've never used a water bath and want to learn how, then watch this video on how to make a water bath for cheesecake! I like her trick of using a bigger pan to protect the cheesecake and to avoid cheesecake water bath leaks. It really is a much better way than the old aluminum foil method that tends to leak. Because a water bath is still the ideal method.
💧 Cheesecake water bath leak
If you do find yourself with a water bath leak, don't despair- it does not necessarily mean your cheesecake is a write-off. Get it out of the bath ASAP and immediately switch to the water bath method above! Drain off any water from the springform pan, give it a shake and a giggle and dry off the pan with a tea towel or paper towel. Continue cooking and hope for the best. *Rest assured -Tthis has happened to me several times (before I started using the larger pan method) and my cheesecake was NEVER ruined.
However, if it does end up soggy, read HERE about how to save a soggy cheesecake!
📖 Variations
Non - alcoholic: If you prefer to use Grand Marnier extract/flavoring (affiliate link) be sure to read the equivalents on the bottle (you will use a lot less, as it's concentrated)
🍽 Equipment
I recommend you use a springform pan (preferably 9 or 10 inch) for this recipe (see my Amazon recommendations in recipe card NOTES) because it will make your life easier. However, if you don't have that type of pan and/or don't want to purchase one, you can make a cheesecake without it. You can read about how to make a cheesecake without a springform pan HERE.
🌡️Storing
Make-ahead and refrigeration: This cheesecake can be made a day or two in advance and you can store it in the fridge for up to 3 days.
Freezing: You can freeze cheesecakes, so if you plan to, you'll want to check out Taste of Home's guide on how to freeze cheesecakes. However, if you do freeze it and plan to serve it, I do not recommend you freeze it for longer than 2 months. And it's best if you do NOT freeze it with the glaze on. Wait until it's fully defrosted, then glaze it.
***NOTE: My cheesecake in the photos wasn't as firm as it should be in the middle because I didn't have the 8 hours to let it set this time. It's important to let it set for 8 hours or overnight!
Nutrition
Calories: 336kcal | Carbohydrates: 30g | Protein: 4g | Fat: 21g | Saturated Fat: 12g | Cholesterol: 43mg | Sodium: 184mg | Potassium: 67mg | Sugar: 21g | Vitamin A: 465IU | Calcium: 59mg | Iron: 0.7mg
Scan the QR code or visit us at www.foodmeanderings.com