📋Light Baileys No Bake Cheesecake recipe
This easy-to-make Light Baileys No Bake Cheesecake recipe is a creamy and delicious dessert that's perfect for those looking for a lighter option. It's the ideal dessert for St. Patrick's Day or Christmas, for the Baileys Irish Cream lover, or any special occasion or celebration!
Servings 16 servings
Calories 262kcal
Equipment
Ingredients
**HEADS UP: There is a 6-8 hour refrigeration time with this recipe!
Cheesecake Base:
- 2 cups Chocolate baking crumbs
- ⅔ cup unsalted butter melted * measure the MELTED butter
- 3 tablespoon white granulated sugar
Cheesecake filling
- 1 -7 gram package of unflavored gelatin crystals
- ½ cup water (divided into 2)
- 2 - 8 oz packages of light cream cheese room temperature softened
- 1 cup light sour cream
- 3 ounces white chocolate squares **do NOT use white chocolate chips
- ¼ cup baileys irish cream
- ¾ cup white granulated sugar
- ½ cup non- fat Greek yogurt
Garnish (optional)
Instructions
Cheesecake Base:
- Spray an 8 or 9 inch springform pan with non- stick cooking spray.
- Combine chocolate baking crumbs with melted butter and 3 tablespoons of white granulated sugar in a medium bowl.2 cups Chocolate baking crumbs, ⅔ cup unsalted butter, 3 tbsp white granulated sugar
- Mix until all the crumbs are moistened and a thick, crumbly paste forms.
- Press crumb mixture into the greased springform pan. Level and press to the bottom of the pan using a silicone spatula and neatly taper at the edge.
- Cover the pan with plastic wrap and place in the fridge for 15 minutes.
Cheesecake Filling
- Place softened cream cheese, 1 cup white granulated sugar in the large bowl of a stand mixer fitted with a paddle attachment (alternatively, you can use a hand electric mixer and a large mixing bowl).2 - 8 oz packages of light cream cheese room temperature, ¾ cup white granulated sugar
- Mix on low to break down the cream cheese for 30 seconds, and increase to medium speed for another1 minute.
- Scrape the sides of the bowl and add sour cream, Baileys Irish cream and Greek yogurt and mix for 30 seconds or until smooth.1 cup light sour cream, ¼ cup baileys irish cream, ½ cup non- fat Greek yogurt
- Melt the white chocolate in the microwave on ½ power for 1 minute, then check, stir and put back in to microwave for 30 second intervals until melted. *Ensure that you stir at each 30 second interval, as the stirring helps to melt it further.3 ounces white chocolate squares
- Then stir the melted white chocolate into the cream cheese mix. Mix on medium for 30 seconds, scrape the sides, and on medium-high speed for 2 minutes, until smooth and fluffy.
- Mix gelatin crystals and ¼ cup water in a small bowl and allow to bloom for 5 minutes.1 -7 gram package of unflavored gelatin crystals, ½ cup water (divided into 2)
- Heat the other ¼ cup water for 30 seconds in the microwave on high and pour into the gelatin bloom. Stir to dissolve, and allow to cool.
- Starting on low, pour gelatin into the cream cheese mixture. Continue to mix at medium speed for a minute, scraping the sides of the bowl after 30 seconds.
- Pour cheesecake batter into the springform pan with crust and level with a spatula.Tap pan lightly against the counter to get rid of air bubbles. Cover with plastic wrap and refrigerate for at least 6 hours, preferably overnight (8+ hours) *Do NOT add garnish yet.
- Unhinge rim of springform pan and remove. If necessary, smooth edges of cake with a knife (I didn't need to do this)
Garnish (optional)
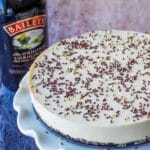
- Add extra chocolate and gold sprinkles to the top of the cake, as desired. *Do not do this until just before serving (or the sprinkles will melt and run)chocolate sprinkles, gold sprinkles
Notes
Top Tip
You can use any brand or type of gold pearls or edible glitter for the garnish. You can buy them at hobby and cake decorating stores (Michael's in Canada) or through Amazon.bDouble-check to ensure your gold sprinkles are edible. Also, note that most gold and silver Dragees are safe to decorate with but NOT edible!
🎥 Video
Check out this video on how to bloom gelatin! (*Just do NOT drain it as they suggest)
🌡️Storage
Store leftover cheesecake in an airtight container in the fridge for up to 4-5 days. It will freeze well in an airtight container for 3-4 months.
If you are making this cheesecake in advance to refrigerate or plan to freeze it, I recommend that you do not garnish it with sprinkles (or anything) until it's fully defrosted and just prior to serving.
🔢WW Points
A typical piece of cheesecake can be up to 21 points! This recipe is 13 WW points with low-fat/light ingredients. You can bring down the points even further by using light butter, non-fat sour cream, and non-fat cream cheese and your points for a slice (1/16) will be 10 ww points . If you use a sugar substitute you can bring down the points even more. I would recommend using Monk Fruit as it's more natural, but keep in mind, you should only use HALF the amount (1.5 tablespoon in the crust and ⅓ cup in the filling)
Serving tip:
To get clean cuts for each piece of cheesecake, run a clean sharp knife under very hot water for at least 30 seconds, wiping the knife with a clean kitchen towel (so it's not wet, but still hot).
Nutrition
Serving: 1slice | Calories: 262kcal | Carbohydrates: 27g | Protein: 4g | Fat: 15g | Saturated Fat: 9g | Polyunsaturated Fat: 1g | Monounsaturated Fat: 5g | Trans Fat: 0.3g | Cholesterol: 36mg | Sodium: 122mg | Potassium: 101mg | Fiber: 0.01g | Sugar: 21g | Vitamin A: 383IU | Vitamin C: 0.2mg | Calcium: 66mg | Iron: 0.1mg
