

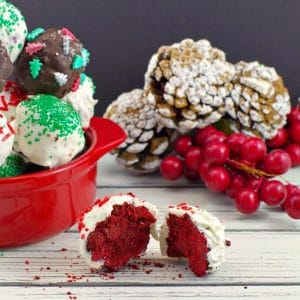
Sometimes mistakes are just meant to be. That is exactly how this festive Christmas Red Velvet Brownie Balls recipe was born. These delicious little Christmas brownie bites can be made from scratch with this homemade brownie recipe or with a red velvet brownie mix. They are the perfect festive addition to your holiday baking tray!
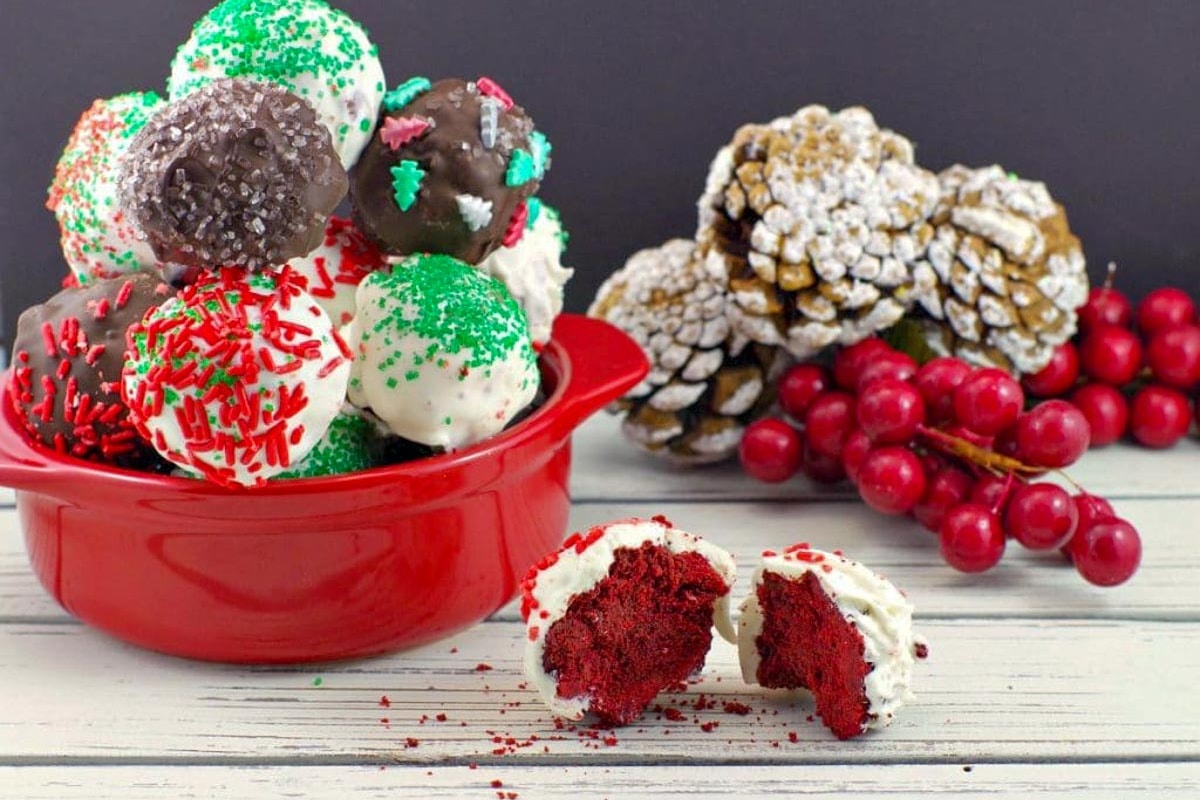
These Brownie Balls are popular during the holidays and make a great addition to a cookie tray.
Jump to:
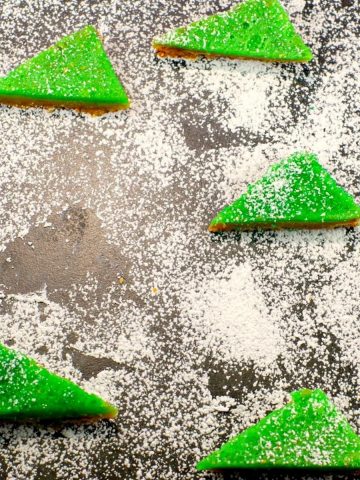
But here's the reason they came about; this is what I was actually trying to make: When I saw these adorable Red Velvet Brownie Christmas Trees a few years back, I just had to make them!
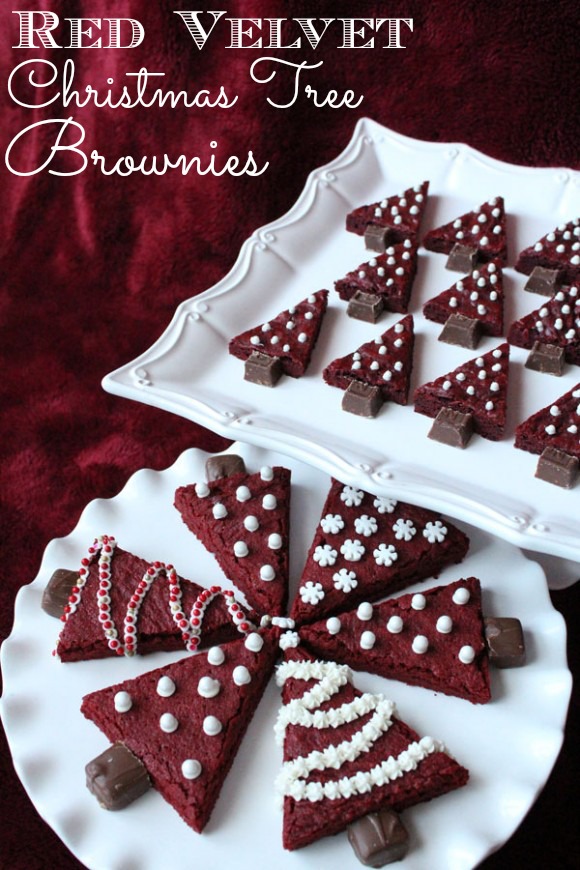
Photo courtesy of Catch my Party.com
Sadly, they were not meant to be. Actually, they were a bit of a disaster. Although I am an experienced baker, I mess things up too. It tends to happen when I'm distracted, hurried or stressed/trying to do too much at once!
So...not wanting to waste them, I morphed them into a new Christmas Tradition. Now Christmas just isn't Christmas without these little brownie bites. So, I keep making them "wrong," -the same way I did the first time I screwed them up. The funny thing is, I still don't know why they didn't turn out and I no longer care.
🥘 Ingredients
For this little brownie bites recipe, you'll need:
- salted butter
- eggs
- white granulated sugar
- vanilla extract
- cocoa
- semi-sweet chocolate chips
- red food coloring * I use Wilton brand no-taste red
- all-purpose flour
- chocolate frosting *I use Betty Crocker Whipped Chocolate Frosting or you can use a homemade frosting
- candy melts - I use white and chocolate
- vegetable shortening
- sparkling sugar
*see recipe card for quantities
📖 Variations
- Red Velvet brownies: You can make these red velvet brownies with brownie mix or using homemade brownies (recipe included). You could even use store-bought brownies, if you can find red velvet.
- Candy melts: you can use any color of candy melts
- Sprinkles, sparkling sugar and sanding sugar - use any color or type you desire
- Brownie pops - put them on lollipop sticks and you have brownie pops!
- Chocolate chips - you could use dark chocolate chips or milk chocolate chips instead
🍽 Equipment
You will need a 9X13 pan for this easy recipe. You could also use a cookie scoop to form the balls.
👪 Serving Size
This Christmas Brownie Balls recipe makes 24 brownie bites. However, you can half, double or even triple the recipe by clicking on the blue servings number in the recipe card. Then select the number of servings you would like and the ingredient amounts will adjust accordingly.
🌡️Storage
Store these Christmas Brownie bites in an airtight container in the fridge for up to 5 days. These also freeze well in an airtight container or freezer bag for up to 2 months.
🎥 Video
Video - How to coat a brownie ball
🦺FOOD SAFETY
- Do not use the same utensils on cooked food, that previously touched raw egg
- Wash hands after touching raw egg
- Don't leave food sitting out at room temperature for extended periods
- Always have good ventilation when using a gas stove
- Never leave cooking food unattendedSee more guidelines at USDA.gov
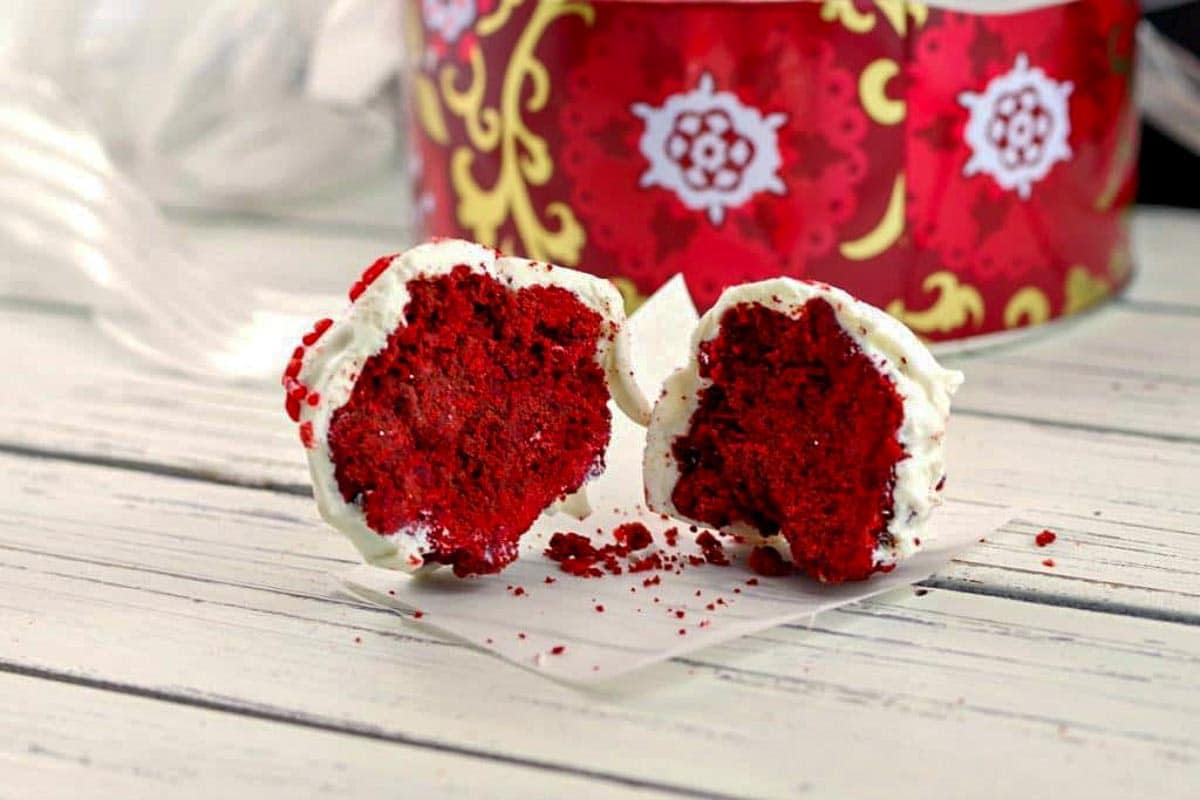
KEEPING IT REAL: And as you can see...these brownie balls are not perfect; nor are they symmetrical. They have lumps and bumps.
I really considered making more better, nicer, rounder ones for these photos. But then it occurred to me that you'd only be disappointed if yours didn't turn out like that. Because they probably won't.
They are brownies, not cake and there is a difference. Brownie crumb is coarser and therefore does not form into as smooth a ball as cake does. And they pretty much always look like this.
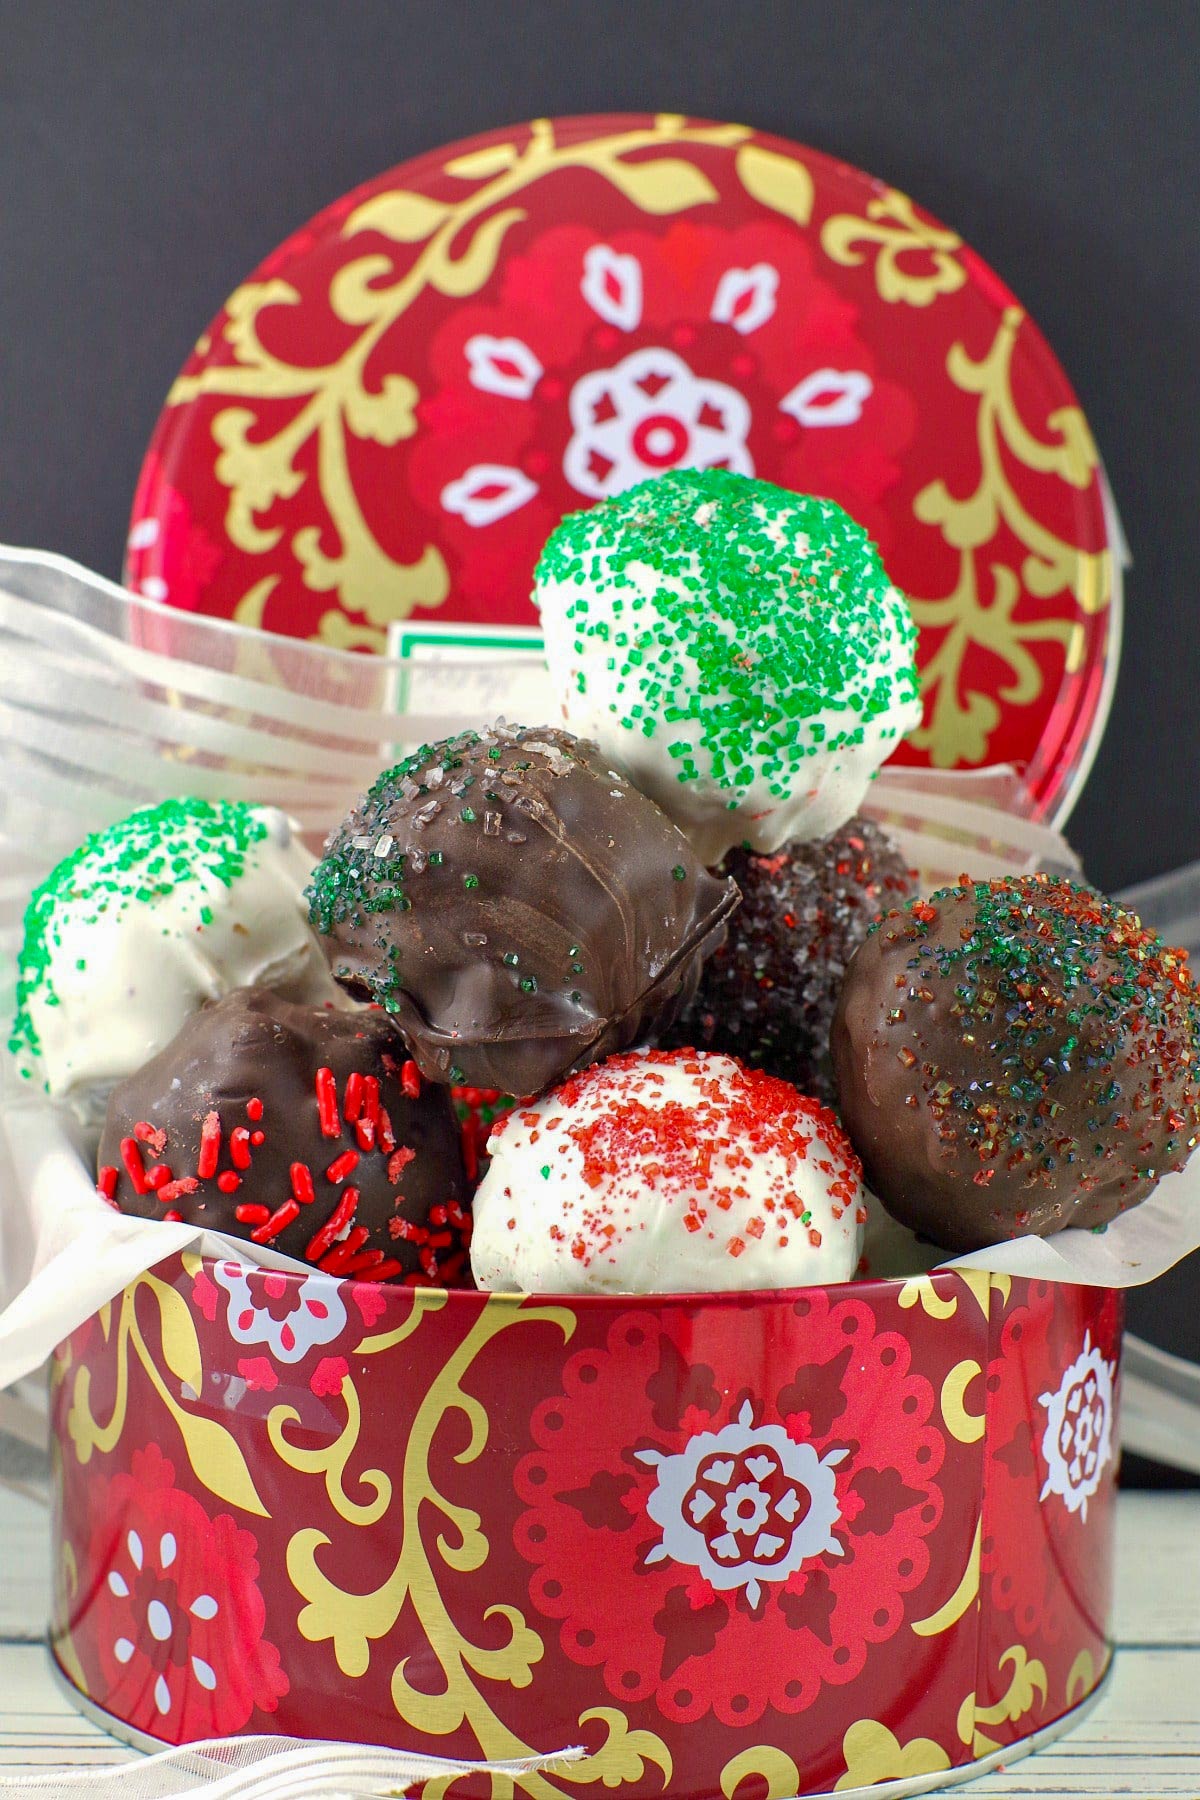
Oh, sure, I could have spent a lot more time forming and shaping them so they would look better for the photo, but life is short! And they still amazing tasting little bites! So, here they are... in all their real, lumpy & bumpy glory.
They are not Pinterest real. They are real world real.
So why not add these real, cute and tasty and perfect bite size Red Velvet Brownie Bites to your last minute Christmas baking list? You can even make these red velvet brownies from a mix to make it quicker and easier. Honestly, I would have done the same if the store wasn't out of them! Although, the homemade is much tastier. Isn't it always?
Happy holidays/Merry Christmas/Happy New Years!
If you like this recipe, please PIN IT and KEEP IT REAL!
⭐ COMMENTS & REVIEWS
Did you know that commenting and rating recipes is one of the best ways to support your favorite recipe creators? If you loved this recipe, please comment and rate it in the recipe card or share photos on social media using the hashtag #foodmeanderings or tagging @foodmeanderings !

📋 Red Velvet Christmas Brownie Balls Recipe
Equipment
Ingredients
Brownies: OR: SUBSTITUTE 'RED VELVET BROWNIE MIX'
- 1 cup salted butter
- 3 large eggs
- 1 ¾ cups sugar
- 2 teaspoon vanilla extract
- ½ cup cocoa powder
- ½ cup semi-sweet chocolate chips
- 1 ½ tablespoon red food coloring use no- taste red- I buy Wilton brand at Michaels Arts & Crafts or Americolor super red
- 1 ½ cups all-purpose flour
- OR: SUBSTITUTE 'RED VELVET BROWNIE MIX' FOR THE ABOVE INGREDIENTS
Brownie Bites:
- 1 cup chocolate frosting I use store-bought Betty Crocker whipped chocolate icing
- 1-2 12 oz/340g -packages of candy melts- color of your choice. I use white and chocolate * I use Wilton brand
- 4 teaspoon vegetable shortening
Instructions
Brownies: OR: SUBSTITUTE 'RED VELVET BROWNIE MIX'
- Preheat oven to 350 degrees and spray a 9"x 13" pan with non-stick cooking spray.
- Melt the butter in a saucepan over medium heat. Pour into a large bowl. Whisk 3 eggs in another medium mixing bowl.
- Add the sugar, vanilla extract & cocoa powder to the melted butter and combine.
- Melt chocolate chips in a saucepan and add to the sugar mixture. Add the whisked eggs to the sugar mixture and then the flour. Add red food colouring. Add brownie batter to prepared pan. *If using a box mix, bake as per package directions
- Bake brownies at 350 degrees F/176 degrees C for approximately 40 minutes until middle is set (and tester comes out clean and the edges are have separated from the pan.) Let the brownies cool and remove cooled brownies from pan and break into pieces.
Brownies Balls Assembly
- Place brownie balls in your food processor and process to crumb, or you can by hand (but needs to be a fine crumb).
- Mix together with icing. Then form into balls (about 1 ½ ") ** It really helps to have wet hands when you do this part! Place on cookie sheet lined with parchment paper and refrigerate for about 10 minutes. You will really have to compress the balls to get them to stick. Add more icing as needed, 1 teaspoon at a time.
- Meanwhile, melt candy melts on low in pot on stovetop with shortening, stirring frequently. OR you can melt in microwave on ½ power (5 on my microwave). Heat up again as it begins to set, as necessary. ***Be careful not to get melted candy melts anywhere near water or overcook because the candy melts will seize.
- Dip brownie balls in melted candy melts. I use a technique similar to video in notes (see video in notes- "How to coat a brownie ball in candy melts") Then place them on a wax paper (or parchment paper covered) baking sheet.
- Sprinkle on festive sprinkles, sparkling sugar or other decorations before they harden. Then refrigerate for a few minutes if you want them to harden quickly.


Leanne | Crumb Top Baking says
I love that you kept it real Terri! And isn't it the best when a disaster in the kitchen turns into a delightful recipe!? These look delicious, and perfect for the holidays!
Terri Gilson says
Thanks, Leanne! Yes, so glad these turned into something delicious, as many of my disasters haven't 🙂
Denise from Urbnspice says
Your Red Velvet Brownie Bites are adorable, Terri! I can totally relate to baking trials and errors (also known as "Crumb Truffles"). I love what you made from your baking experiences - I am pinning your recipe.
Terri Gilson says
Thank you, Denise! I love the name "Crumb Truffles!"
Diane Galambos says
What a fun idea! These will look great on any holiday treat spread. Clever indeed!
Terri Gilson says
Thanks, Diane!
Melanie @ Bon Appet'Eat says
It looks cute and delicious and it would be perfect for a foodie gift as well so I'm pinning it 🙂
Terri Gilson says
Hi Melanie - thanks! Yes, I love to add them to my baking tray 🙂
Colleen says
Even those those little Christmas trees are really cute, your brownie balls look much more do-able and delicious. I think they are Pin worthy for sure. YUM!
Terri Gilson says
Hi Colleen, Thanks! Yes, I couldn't find the same sprinkles I used before, so I thought those Christmas trees would be super cute 🙂
Jo Vanderwolf says
These would look so lovely on a Christmas cookie tray! I'll be adding these to my list of must tries this year. Thank you for sharing. 🙂
Terri Gilson says
Thanks, Jo. Yes, they are a nice, unique addition to the baking tray. Enjoy!
Karly says
I wish my mess-ups come out as good as these!! Saving these for Christmas!
Terri Gilson says
Thanks, Karly! It was a good save that time, but I've had many not-so-good saves :)!
Sue Slaght says
I love that this was a baking mistake turned brilliant. They do look scrumptious!
Food Meanderings says
Thanks, Sue. They are very tasty!