

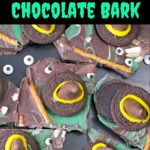

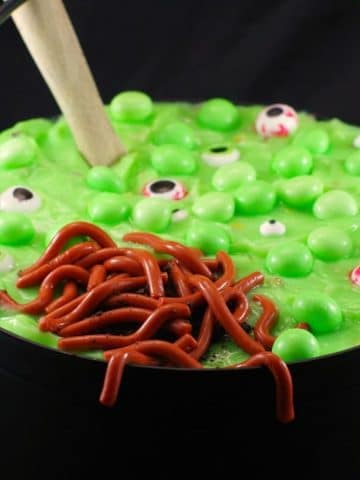
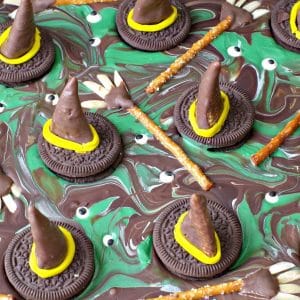
I must have watched that scene from the movie "The Wizard of Oz" at least a hundred times when I was a kid; it was just that satisfying. I had wanted that witch dead so badly, and when she actually melted, it was epic! And that was the inspiration for this sweet and savory Melted Witch Halloween Bark Recipe. This Halloween bark is a sweet, savory combination of dark chocolate swirled into milk chocolate, green candy melts, chocolate-covered bugle cookie witch hats, candy eyeballs, and chocolate almond pretzel witch brooms.

This is a really easy-to-make and delicious chocolate bark that makes a fun and tasty Halloween treat! This Melted Witch Bark recipe is popular during the Halloween season, great for a Halloween party, and such an easy Halloween dessert that everyone will love! And if you're looking for more Halloween ideas, check out these Halloween Potluck Foods!
Jump to:
In the movies, they made ridding the world of evil look so easy. And when I grew up, I was sorely disappointed that it wasn't quite as simple as throwing water in evil's general direction and watching it melt away. But eventually, I came to realize that perhaps the universe rids the world of evil in other ways; ways we cannot necessarily understand or explain... It's called karma.
🥘 Ingredient Notes
- Chocolate candy melts. Candy Melts are easy to use and will hold their shape at room temperature, so you don't have to worry about your candy melting if left out.
- Chocolate cookies * Oreo cookies, Girl Guide Cookies (any kind)
- Bugles- Sadly, this product has been discontinued in Canada. If you can't find Bugles where you live, try an Asian supermarket like A-Mart or T & T market and buy some Tongari Corn (it's a Japanese snack that's very similar to Bugles). If you can't find either, you can use Hershey kisses.
- Fondant (yellow) - you can find a small box of yellow colored fondant at your local craft store (Michael's in Canada) or order online from Amazon
- Melting chocolate - I buy this in bulk from Bulk Barn - it's more economical to buy larger quantities of chocolate this way. I also use it for my Christmas Chocolate Bark Recipe
- Candy eyes- you can also get these online through Amazon or at a craft store

This Wizard of Oz is a classic and still one of my all-time favorite movies. And if you have never seen this movie, it's a must. Not only were the life lessons powerful, but the gratification I experienced watching evil melt into a puddle was like nothing else I had ever experienced in my short 8 years on this earth. And there's been nothing like it since. You can watch the melting witch scene from "The Wizard of Oz" by clicking on the blue button!
Watch the Melting Witch Scene HERE!
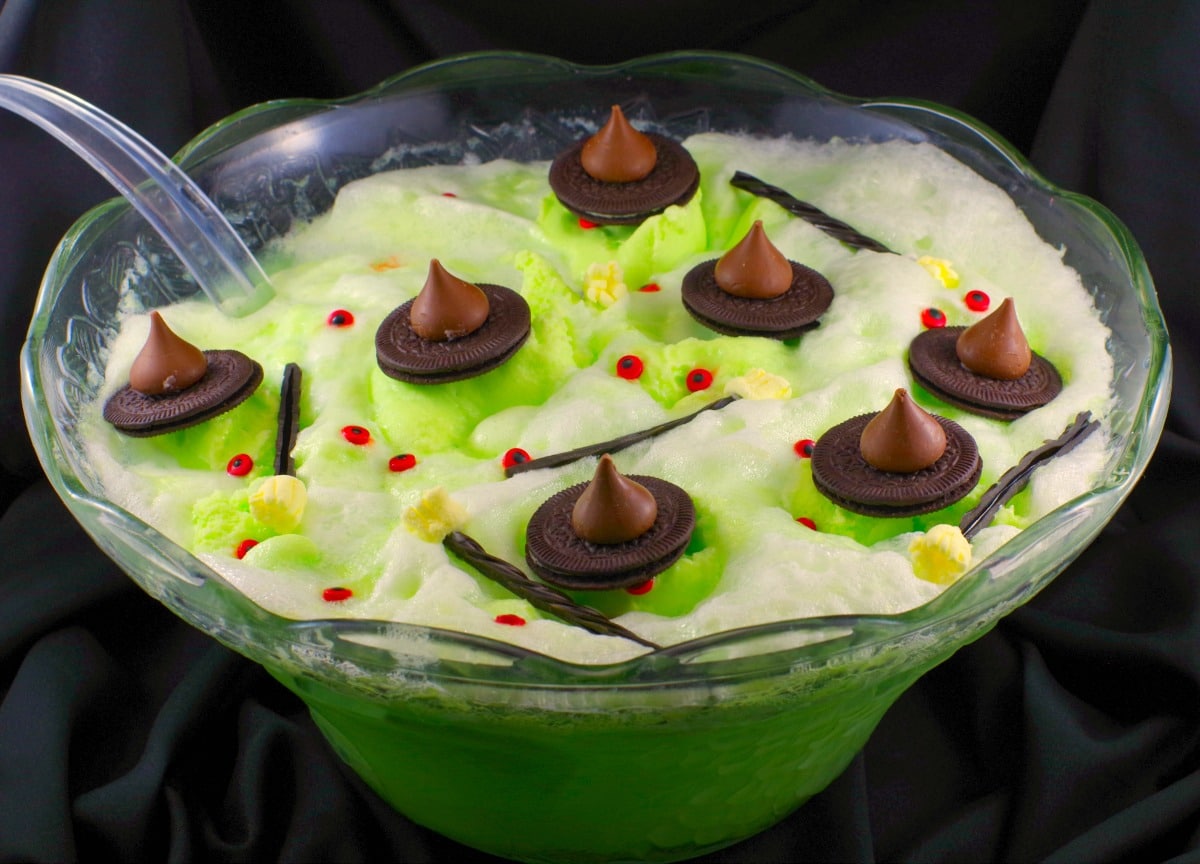
In fact, I love this melted witch theme so much that I also created this Melting Witch Halloween Punch (non-alcoholic)!
Chocolate bark is such an easy Halloween treat to make because you don't need to bake it or even use your stove- you can use your microwave (just be sure to use ½ power (50%) and keep an eye on it). If you cook it too long, it will seize (becoming crumbly and hard).
And like the Wicked Witch of the West, water is BAD for chocolate and candy melts! If they come into contact with water, they will seize. Make sure your bowls and utensils are dry!
🔪Step-by-Step: How to Make Melted Witch Bark

- Step 1: Melt the milk chocolate candy melts on ½ power in 30-second intervals. Keep checking, removing, and stirring. Dip each bugle in the melted chocolate candy melts and gently shake off excess. .

- Step 2: Immediately place bugles onto cookies and allow them to harden

- Step 3: Once hardened, form a snake out of fondant and wrap it around the rim of each cookie hat, trimming to fit.

- Step 4: Reheat the remaining milk chocolate candy melts if necessary. Dip one end of each pretzel stick into milk chocolate and lay it on parchment paper. Add 4 almond slivers to each pretzel. Then spoon a little chocolate over the top of the almond sliver and let it harden. Once hardened, trim the edges of the brooms.

- Step 5: Line a cookie sheet with parchment paper. Melt chocolate (or milk chocolate chips) at 50% (½ power) in a medium microwave-safe bowl in 30-second intervals, stirring between, until melted (alternatively, you could use the double boiler method). Pour onto the prepared pan (lined with parchment paper). Melt semi-sweet chocolate in the microwave the same as above. Drop by spoonfuls onto melted milk chocolate, then swirl with a knife to get the desired effect.

- Step 6: Melt green candy melts in microwave, same as chocolate, then drop by spoonfuls (to make puddles) Take a knife and only swirl at some of the edges to get the desired effect. Place cookie witch hats evenly (you can make more and add more if you like). Then place the brooms evenly throughout (you can also make additional brooms). Add the eyeball candies evenly throughout. Bang the bottom of the cookie sheet down on the counter 3 times.
Expert Recipe Tips
- Use high-quality chocolate - The flavor of the bark really depends on the chocolate. If possible, use good-quality melting chocolate or couverture chocolate instead of just chocolate chips for a smoother melt and better snap.
- Work quickly with candy melts - Candy melts harden faster than chocolate. Have your decorations (witch hats, brooms, and candy eyes) ready before you pour the bark so you can place them right away.
- Thin candy melts if needed - If your candy melts are too thick after melting, stir in ½-1 teaspoon of vegetable shortening or coconut oil to loosen the texture for easier spreading and dipping.
- Avoid overheating chocolate - Always melt at 50% power in short intervals, stirring between each. Overheating causes chocolate to burn or seize, making it unusable. And be sure to keep any moisture away from the chocolate or utensils you are using.
- Line your baking sheet properly - Use parchment or wax paper (not foil) to prevent sticking and to make removing and breaking the bark easier.
- Tap the pan to release air bubbles - Gently bang the tray on the counter several times after spreading the chocolate to help settle it and give the bark a smooth surface.
- Create contrast with swirling - For a dramatic "melted" look, don't over-swirl the chocolates and candy melts. Less swirling creates more defined color separation.
- Let it set at room temperature first - If you refrigerate the bark too soon, condensation can form on the surface. Allow it to harden at room temperature, then chill briefly if needed for quicker setting.
- Make extras of the hats and brooms - They're fun to snack on separately, and having a few extras ensures your bark looks full and decorated even if some break while assembling.
- Store in layers with parchment - If stacking pieces of bark, separate layers with parchment or wax paper so they don't stick together.

👪 Serving Size
This melted witch bark can be broken into about 18 good-sized pieces, but you can break it into small pieces if you wish. However, you can half, double, or triple the recipe by clicking on the serving number and selecting the number of servings you'd like. The ingredient quantities will automatically adjust. You will just need additional baking sheets.
🌡️Storing: How to Store Halloween Bark
You can store this Melting Witch Halloween bark recipe at room temperature for up to 2 weeks, once the chocolate is set completely and broken into pieces. It's best to store it in an airtight container in a cool, dry place, such as your pantry (ideally less than 70ºF).
I prefer to keep it in the freezer (it will keep there for up to 2 months), if I'm hanging onto it any longer than a few days, although it usually doesn't last that long!

❔ Recipe FAQs
Can I use white chocolate instead of milk or dark chocolate?
Yes! White chocolate works well and gives the bark a brighter, more colorful look. Just keep in mind that it's sweeter, so you may want to balance it with a bit of semi-sweet or dark chocolate swirled in.
You can substitute with mini M&M's, chocolate chips, or even small dots of piped white and dark chocolate to create homemade eyes.
For neater pieces, score the bark with a sharp knife after it has partially set but before it hardens completely. Otherwise, you can break it into more rustic chunks once fully hardened/
If the chocolate becomes grainy or thick, you can sometimes rescue it by stirring in a small amount of vegetable oil or shortening. If that doesn't work, it's best to start over with fresh chocolate.
Didn't find the answer you're looking for?
Ask AI to answer based on this specific recipe

So, if you're looking for a fun treat that's perfect for the spooky season, you'll love this chocolate bark!
Eating Melted Witch is just as gratifying as watching a witch melt, so dig in, get into the Halloween spirit, and enjoy this delicious Melted Witch Halloween Bark!
🎃More Halloween Recipes!
Did your family❤️this recipe? Did you know that commenting and⭐rating recipes is one of the best ways to support your favorite recipe creators? If you LOVED this recipe, please comment and rate it in the recipe card or share photos on social media using the hashtag #foodmeanderings or tagging @foodmeanderings !

📋 Melted Witch Halloween Bark Recipe
Equipment
Ingredients
Witch hats:
- ½ 340 g package of milk chocolate candy melts
- 12 chocolate cookies * I use girl guide, but you can use oreos or any kind
- 12 bugles
- fondant, yellow
Witch Brooms:
- 48 almond slivers * approximately
- 12 pretzel sticks
Chocolate Bark:
- ½ 340 g package of green candy melts
- 2 lbs milk chocolate (melting chocolate) * you can also use milk chocolate chips
- 4 oz semi sweet dark chocolate
- .5 lb of semi-sweet chocolate (8 oz)
- 18 white candy eyeballs or small red candy eyeballs approximately
Instructions
Witch Hats:
- Melt the milk chocolate candy melts on ½ power in 30 second intervals. Keep checking, removing and stirring.
- Dip each bugle in the melted chocolate candy melts and gently shake off excess.
- Immediately place bugles onto cookies and allow to harden.
- Once hardened, make a snake out of fondant and fit around the rim of each cookie hat, trimming to fit.
Witch Brooms:
- Reheat the remaining milk chocolate candy melts if necessary. Dip one end of each pretzel stick into milk chocolate and lay on parchment paper. Add 4 almond slivers to each pretzel. Then spoon a little melted chocolate over the top of the almond sliver and let harden.
- Once hardened, trim the edges of the brooms with a paring knife.
Chocolate Bark:
- Line baking sheet with parchment paper. Melt melting chocolate (or milk chocolate chips) at 50% (½ power) in microwave safe bowl in 30 second intervals, stirring between, until melted. Pour onto prepare pan (lined with parchment paper).
- Melt semi sweet chocolate in microwave the same as above. Drop by spoonfuls onto melted milk chocolate then swirl with knife to get desired effect.
- Melt green candy melts in microwave same as chocolate, then drop by spoonfuls (to make puddles) Take a knife and only swirl at some of the edges to get the desired effect.
- Place cookie witch hats evenly (you can make more and add more if you like). Then place the brooms evenly throughout (you can also make additional brooms). Add the eyeball candies evenly throughout.
- Bang bottom of cookie sheet down on counter 3-4 times to remove air bubbles.
- Set aside and allow to harden for 1-2 hours. Cut and serve
Notes
- Use high-quality chocolate - The flavor of the bark really depends on the chocolate. If possible, use good-quality melting chocolate or couverture chocolate instead of just chocolate chips for a smoother melt and better snap.
- Work quickly with candy melts - Candy melts harden faster than chocolate. Have your decorations (witch hats, brooms, and candy eyes) ready before you pour the bark so you can place them right away.
- Thin candy melts if needed - If your candy melts are too thick after melting, stir in ½-1 teaspoon of vegetable shortening or coconut oil to loosen the texture for easier spreading and dipping.
- Avoid overheating chocolate - Always melt at 50% power in short intervals, stirring between each. Overheating causes chocolate to burn or seize, making it unusable. And be sure to keep any moisture away from the chocolate or utensils you are using.
- Line your baking sheet properly - Use parchment or wax paper (not foil) to prevent sticking and to make removing and breaking the bark easier.
- Tap the pan to release air bubbles - Gently bang the tray on the counter several times after spreading the chocolate to help settle it and give the bark a smooth surface.
- Create contrast with swirling - For a dramatic "melted" look, don't over-swirl the chocolates and candy melts. Less swirling creates more defined color separation.
- Let it set at room temperature first - If you refrigerate the bark too soon, condensation can form on the surface. Allow it to harden at room temperature, then chill briefly if needed for quicker setting.
- Make extras of the hats and brooms - They're fun to snack on separately, and having a few extras ensures your bark looks full and decorated even if some break while assembling.
- Store in layers with parchment - If stacking pieces of bark, separate layers with parchment or wax paper so they don't stick together.


Terri Gilson says
My husband (who barely eats anything sweet) couldn't stop eating this! He said it was absolutely DELICIOUS!
Nicoletta sugarlovespices says
This would have been so much fun to make and I bet even more to eat! I have to admit, I've only seen pieces of the Wizard of Oz, never the whole movie...
Terri Gilson says
Thanks, Nicoletta! Oh it was fun it eat and so yummy! My husband isn't much of a sweets guy, but asked if I had any more of that 'witch chocolate' 🙂
Denise from Urb'n'Spice says
That is one of the cutest Hallowe'en treat items that I have ever seen, Terri! I love it. I will pin it for next year. Thanks for sharing. 🙂
Terri Gilson says
Thank you, Denise! It was fun to make and my family loved it!
Leanne | Crumb Top Baking says
This is so fun and creative Terri! My nephews would have loved this! I need to remember to make this next year!
Terri Gilson says
Thanks, Leanne! I hope they enjoy it 🙂
Colleen says
I was a huge fan of the Wizard of Oz, too! These little melting witches are adorable and fun. Thanks for sharing, Terri, and spreading the good Karma!
Terri Gilson says
Thanks, Colleen! Glad to have found a kindred spirit - that movie is magical 🙂
Dawn - Girl Heart Food says
Oh my goodness! This is beyond cute! My niece would have so much fun making (and then eating) this! Adorable!!
Daire says
This has to be the most fun chocolate bark I've ever seen! I just featured this recipe on my Halloween Foods roundup on my site!
Terri Gilson says
Thanks!