


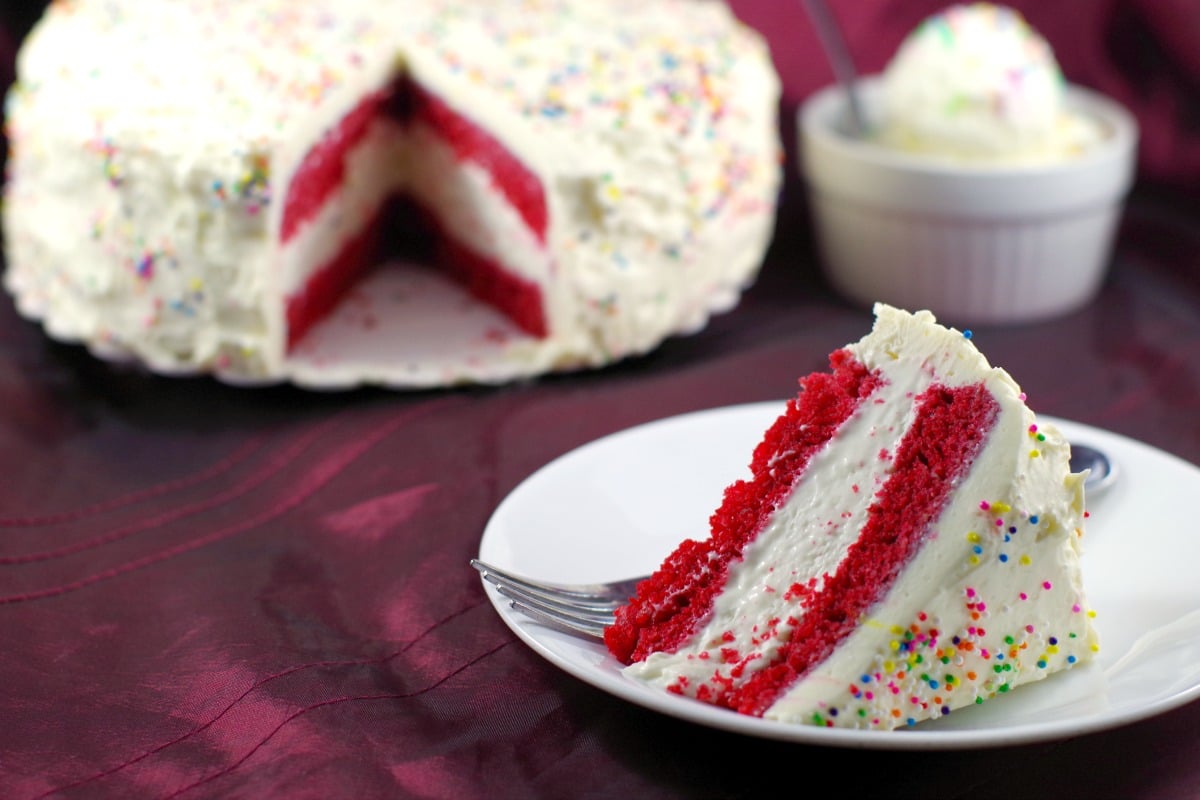
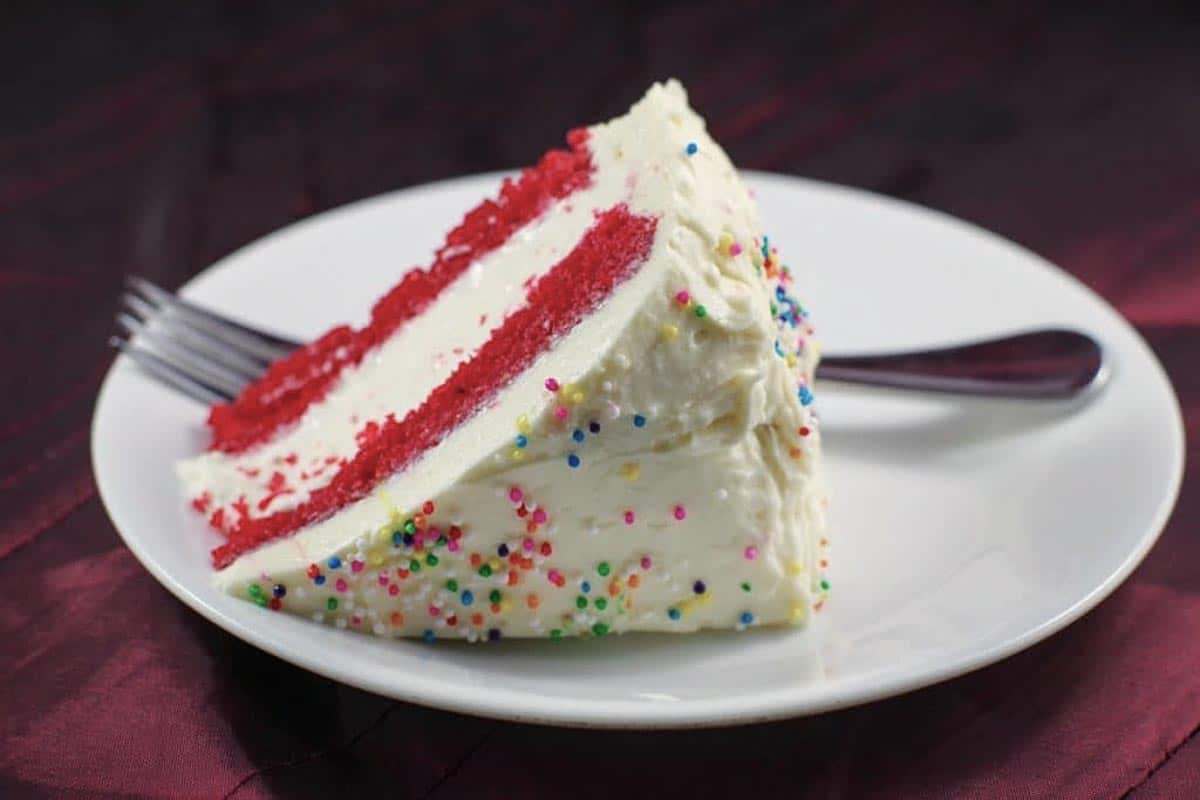
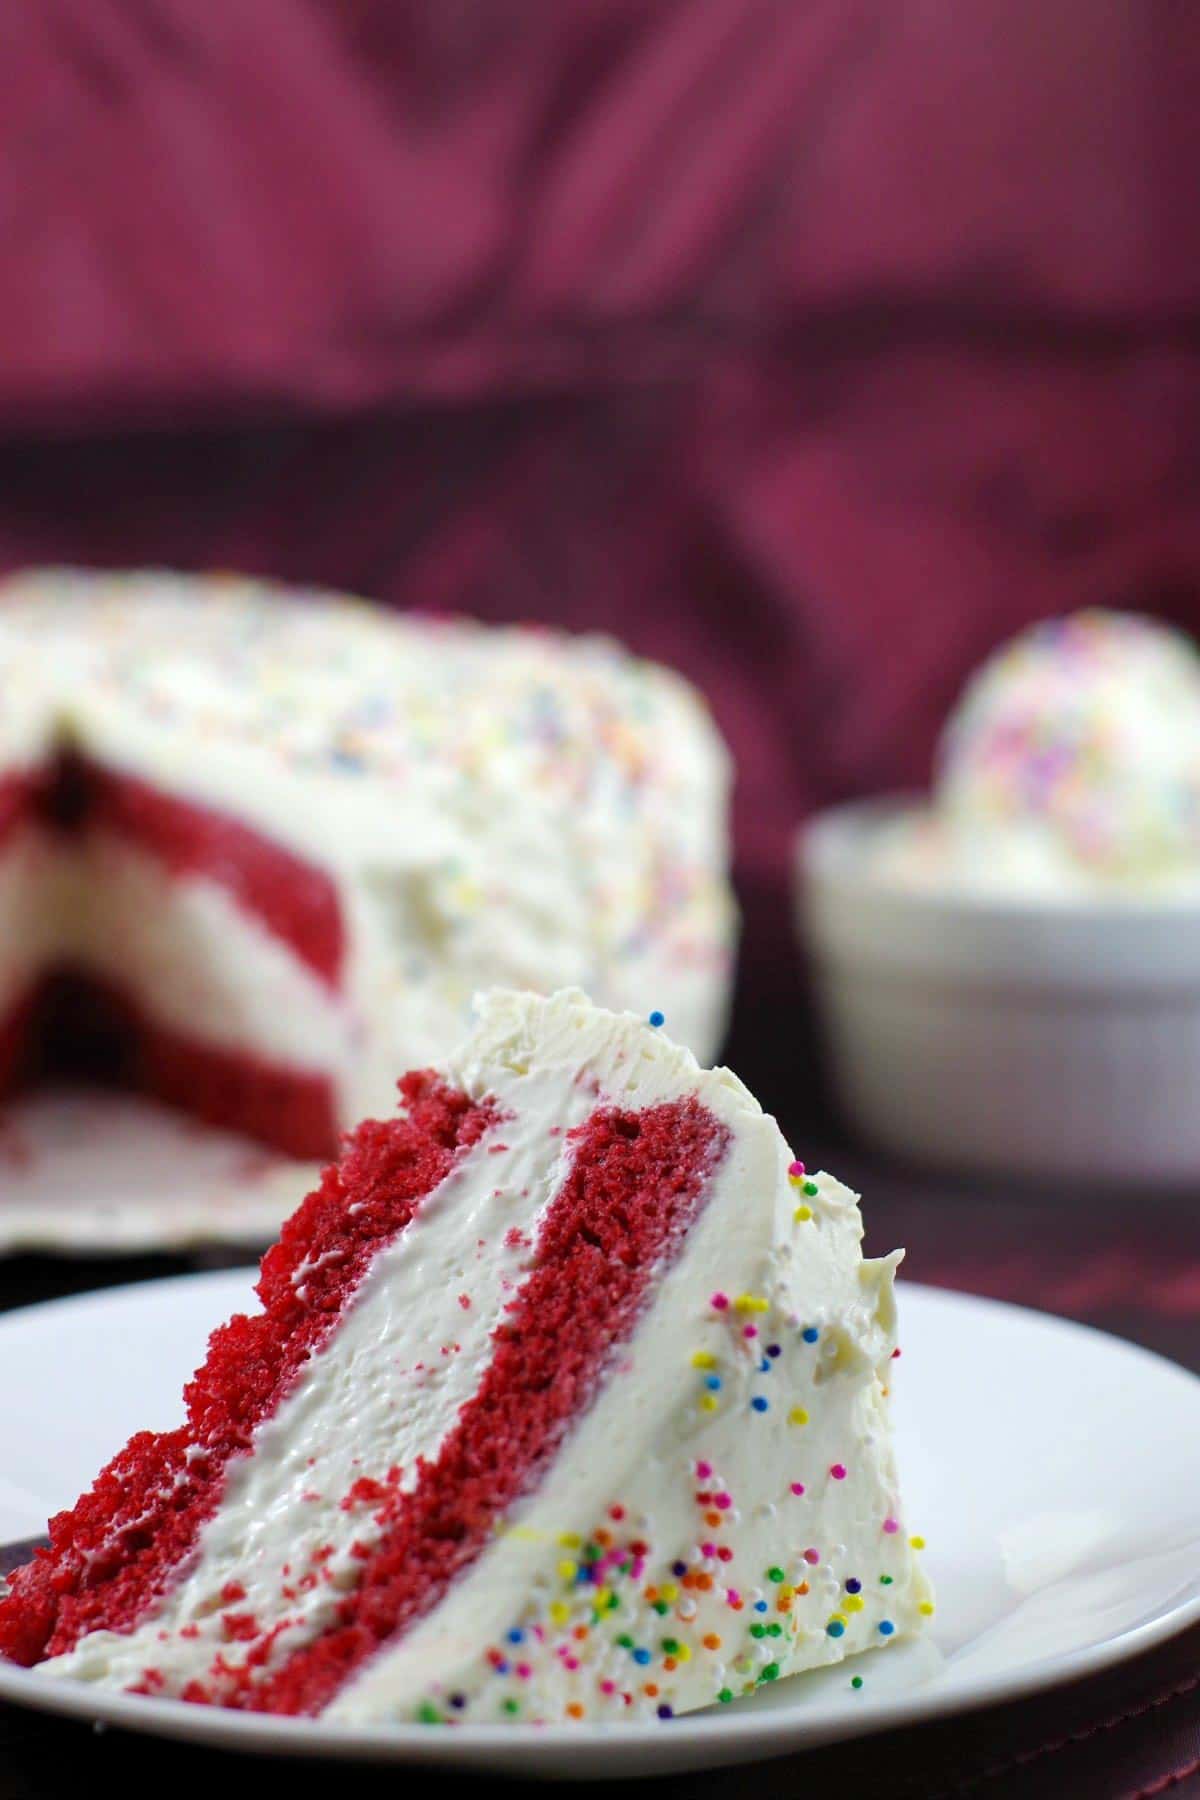
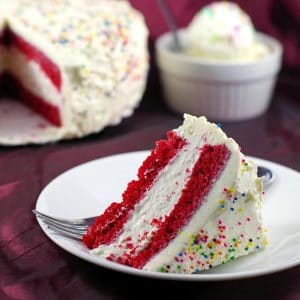
This Red Velvet Ice Cream Cake recipe has layers of pillowy, fluffy, and light Red velvet cake cushioning an easy no-churn homemade ice cream recipe filling, all smothered in dreamy creamy white chocolate cream cheese icing!
This recipe is popular in the summer, but great any time of the year. Whether you're looking for a birthday cake, a summer cake, Valentine's Day, or a cake for a special occasion, you'll love this one! It pairs perfectly with a summer meal like Slow Cooker Pulled Pork on a Bun or this Creamy Bacon Ranch Chicken Pasta Salad! Or pair it with this Baked Cornish Hens in wine sauce for Valentine's Day!
Jump to:
When my son was turning 12, I asked him the annual birthday question, "What kind of cake do you want?" and he chose Red Velvet. I wasn't surprised-it's his favorite. Though more popular among brides-to-be than 12-year-old boys, my boy wasn't like most.
Having sampled countless cakes since he could eat solid food, this boy knew his cake! And since he also loves ice cream cake, we decided on a red velvet ice cream cake (the best of both worlds)
LOVE ice cream cake too? Then be sure to try my Cookie Dough Ice Cream Cake (DQ Copycat) and my Neapolitan Ice Cream Cake!
I used a no-churn cheesecake ice cream filling, my favorite Red Velvet Cake (adapted from Chef Steph's Southern Red Velvet), as well as my favorite Dreamy Creamy White Chocolate Cream Cheese Frosting by Rose Levy Barenbaum (with a few of my own changes/adaptations), which all culminated in this delicious Red Velvet Ice Cream Cake!
In other words, I have taken the BEST of the BEST recipes and combined them into The BEST red velvet ice cream cake recipe out there!
🥘 Ingredient Notes
For the red velvet cake, you'll need:
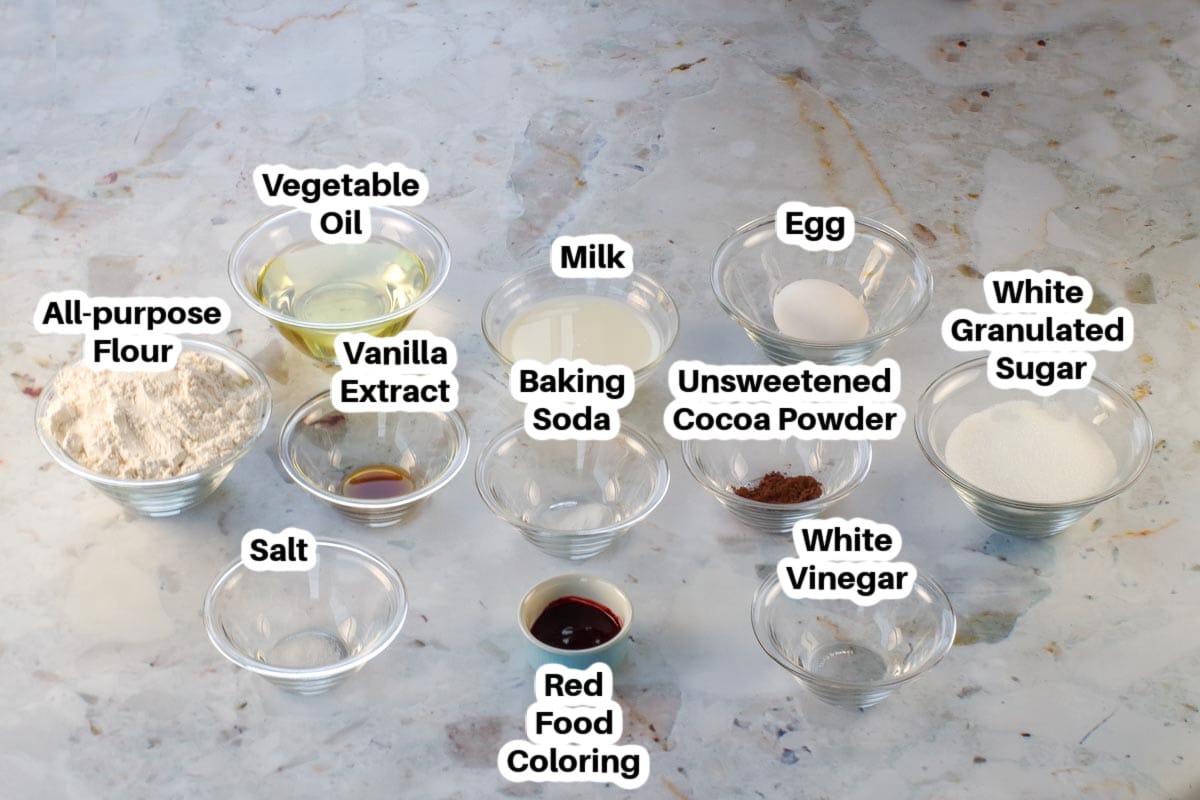
- Red Food Coloring. It's important that you use gel food coloring, as it's more concentrated than the liquid kind you get at the grocery store. These are the types of food coloring usually used in frosting/icing. I use Americolor super red food coloring because it's the best, in my opinion, and you don't have to use as much as you would with other gel food coloring brands. You can use another brand such as Wilton gel color, but make sure you buy "no taste red" because red often has a strong taste that's unpleasant, especially if you have to use a lot to get the desired color. I would recommend you don't even bother with grocery store coloring, as you'll never achieve this red color using it.
For the Cream Cheese Ice Cream Filling you'll need:
- Whipping cream. Use 33-36% fat whipping cream.
For the Dreamy Creamy White Chocolate Cream Cheese Frosting you'll need:
- White Chocolate. Make sure you use the white chocolate baking bar and not chocolate chips.
- Sprinkles. I use rainbow but you could use any type.
📖Variations & Substitutions
- Frosting- you can use a whipped cream frosting, such as my EASY Stabilized Whipped Cream Frosting (with piping gel) or my 2 Ingredient White Chocolate Whipped Cream Frosting (Ganache) a shortening-based frosting for this cake. Or you can use your favorite frosting.
- Red Velvet Cake - you can use your favorite red velvet cake recipe or a boxed cake mix.
Expert Recipe Tips
Cake Tips:
- Use High-Quality Food Coloring - Americolor Super Red or Wilton "No Taste Red" will give you a vibrant red hue without an unpleasant aftertaste. Avoid grocery store food coloring, as it requires too much to achieve the right color.
- Don't Overmix the Batter - Overmixing can lead to a dense cake. Mix just until the ingredients are combined for a light and fluffy texture.
- Cool Completely Before Assembly - Ensure your cake is fully cooled before adding the ice cream layer to prevent melting.
Ice Cream Tips:
- Chill the Mixing Bowl - When whipping the heavy cream, chill your bowl and beaters to help achieve stiff peaks faster.
- Gently Fold - When mixing the sweetened condensed milk mixture with the whipped cream, use a light, delicate folding motion to maintain the airy texture.
- Don't Rush the Freezing Process - Let the ice cream freeze for at least 8 hours (or overnight) to ensure a firm consistency that holds up when assembling.
- Use the Same Pan Size - Line an 8-inch cake pan with plastic wrap for the ice cream layer. This ensures it matches the cake layers perfectly and makes assembly easier.
Frosting & Decorating Tips:
- Use High-Quality White Chocolate - A white chocolate baking bar (NOT white chocolate chips) melts more smoothly and blends better into the frosting.
- Let the Frosting Sit at Room Temperature - Since the frosting firms up in the fridge, let it sit for about 30 minutes before spreading for easy application.
- Crumb-free Frosting: I use Wilton Cake Release (affiliate link). The cakes come out of the pan without sticking, then I brush off any red velvet cake crumbs with a pastry brush before I frost it.
- Crumb Coat for a Clean Finish - Apply a thin layer of frosting first, freeze for 30 minutes, then frost fully to prevent red crumbs from mixing into the white frosting.
- Add a generous amount of frosting then spread- Another trick to avoid getting cake crumbs in your frosting is to work in sections, adding a generous amount of frosting to each section and spreading it from the top so your knife doesn't need to touch the crumb coat.
- Use a separate bowl - Always use a separate bowl for the frosting you are working with at that moment, as you can scrape off any crumbs that come into contact with your knife and you won't accidentally add crumbs to the main container of frosting.
- Warm Your Knife for a Smooth Finish - Run your spatula or knife under warm water, dry it, and use it to smooth the frosting for a polished look.
- Work Quickly When Decorating - Ice cream melts fast, so frost and decorate the cake efficiently, then return it to the freezer immediately.
Storage & Serving Tips:
- Let It Sit for 5 Minutes Before Serving - This allows the ice cream to soften just enough for easier cutting and eating.
- Use an Airtight Cake Container - This prevents freezer burn and keeps the cake fresh.
- Slice with a Warm Knife - Dip a knife in hot water, wipe dry, and slice for clean, even cuts.
If you're not sure how to make Red Velvet Ice Cream Cake or even a little intimidated by it, do not be -it is easy! Although it's time-consuming, it is as simple as making a cake, making the no-churn ice cream separately, sandwiching them together, and covering it all in frosting.
🔪How to Make Red Velvet Ice Cream Cake
PREP: Preheat oven to 350 degrees F/ 176 degrees C. Prepare two 8"round pans. I use Wilton Cake Release to prevent sticking (see NOTES)
* Heads up! There is a minimum 8-hour freezing time with this cake.
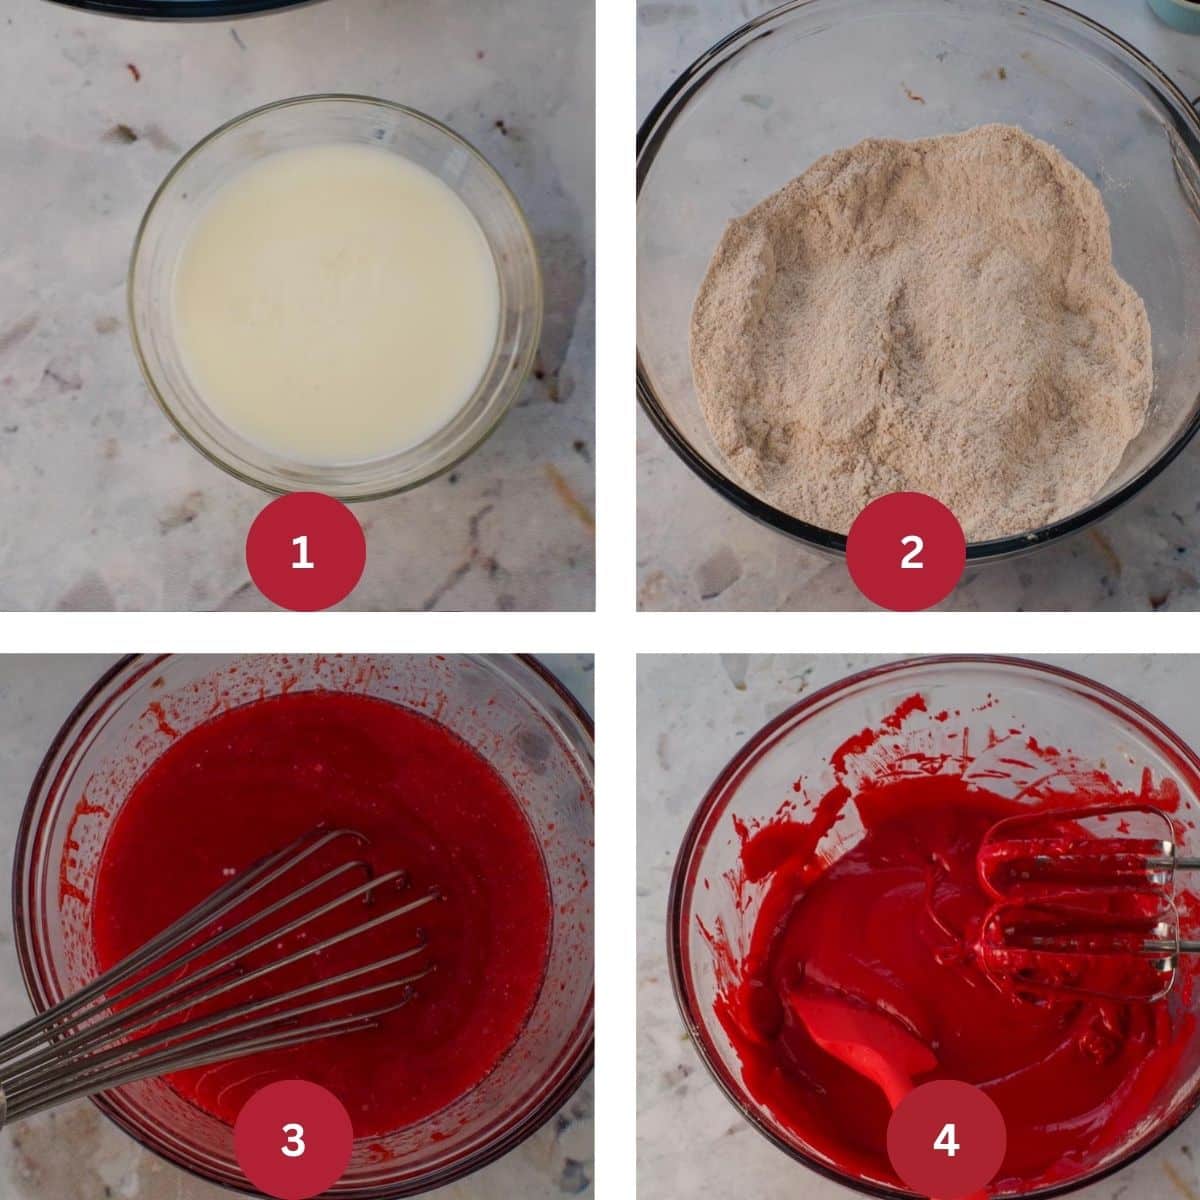
MAKE THE CAKE (STEP 1): Add vinegar to milk and let stand for 5 minutes. (IMAGE 1). Sift all dry ingredients together into a large bowl. (IMAGE 2). In another bowl whisk together all wet ingredients. (IMAGE 3). With the mixer on low speed, blend the wet ingredients with the dry ingredients, until just combined (IMAGE 4).
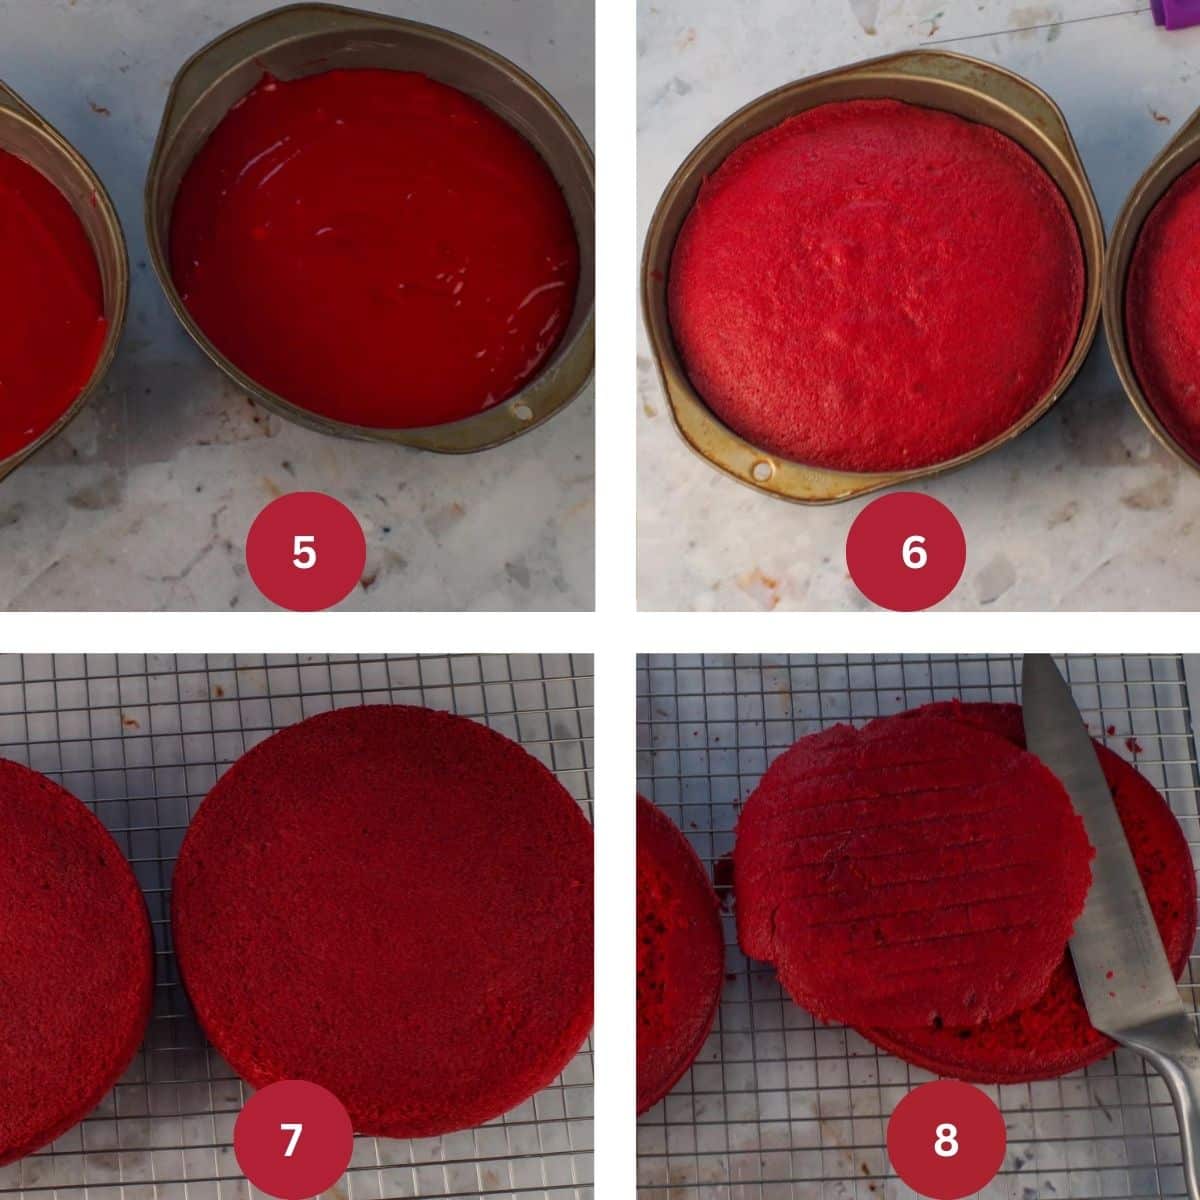
BAKE THE CAKE (STEP 2): Divide the cake batter between greased 8-inch cake pans (IMAGE 5). Bake until a tester inserted in the center comes out clean - about 25- 30 minutes (IMAGE 6). When cake is done, cool for 10 minutes, then transfer to wire rack Cool for another 15 minutes (IMAGE 7). Then level the cake by slicing off the 'hump'. (IMAGE 8).
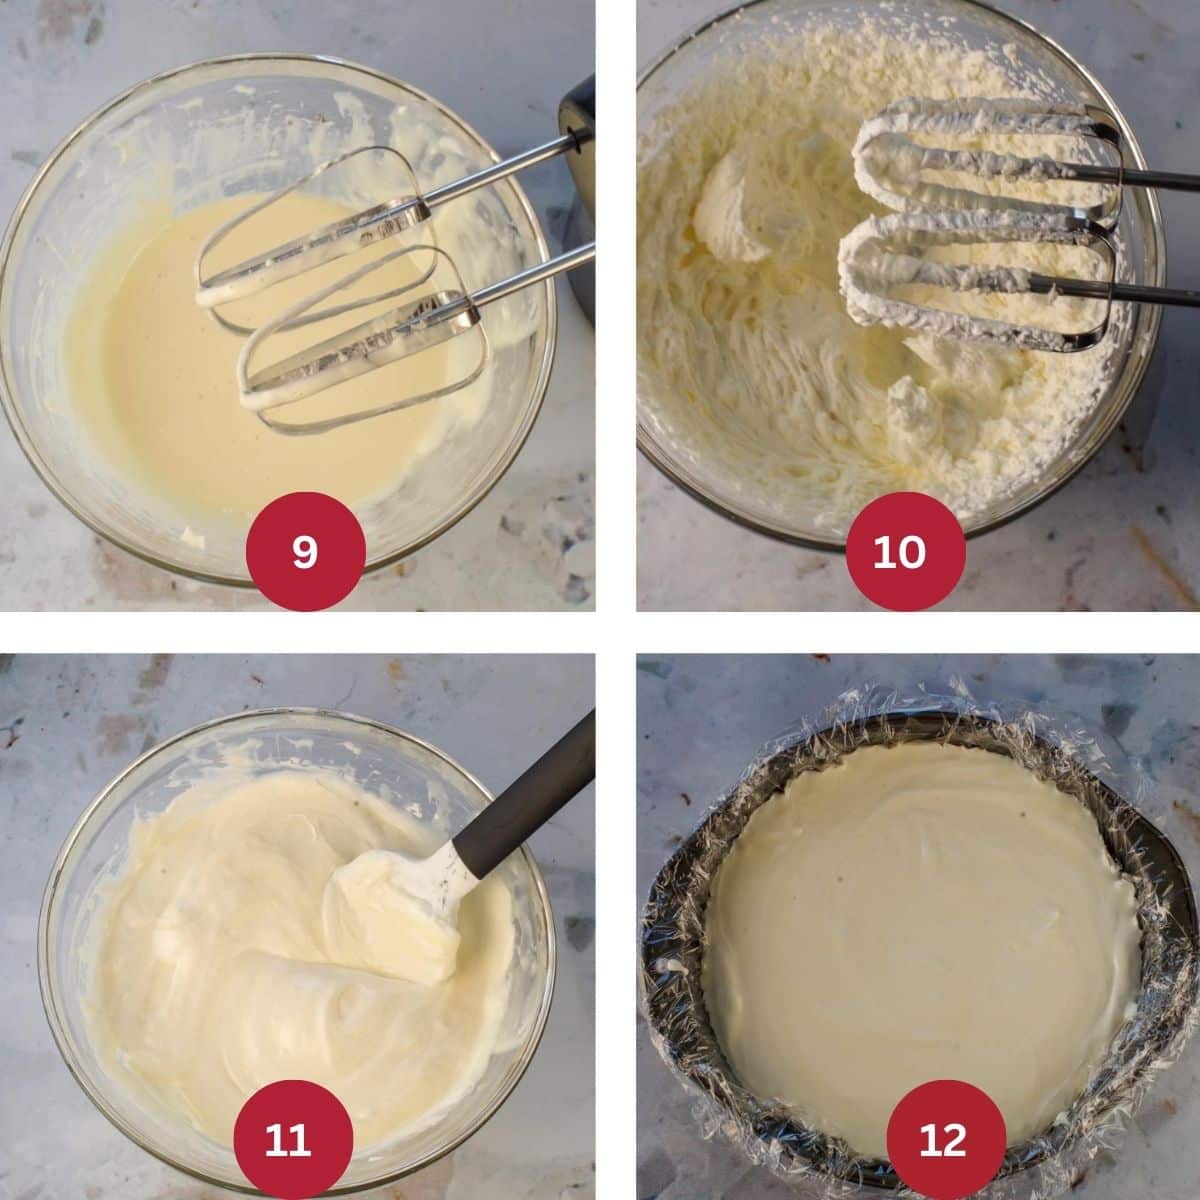
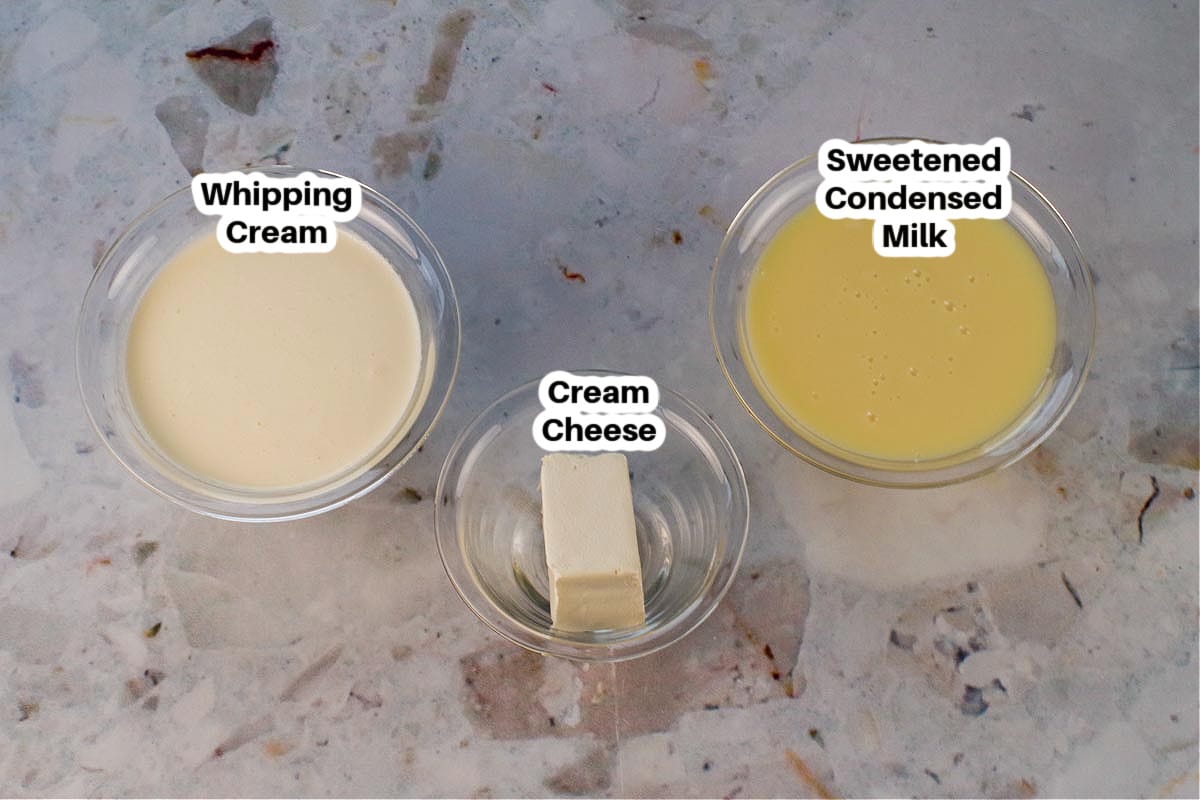
MAKE THE ICE CREAM FILLING (STEP 3): In a large bowl, beat together the cream cheese and the sweetened condensed milk (IMAGE 9). In a separate bowl, beat the whipping cream until it has stiff peaks (IMAGE 10). Gently fold the cream into the cream cheese mixture and stir until combined (IMAGE 11). Line an 8-inch baking pan with plastic wrap (*use the same size you used for the cakes!) Add the ice cream to the pan, smoothing out the top (IMAGE 12). Cover the top with plastic wrap and freeze until solid, at least 8 hours to overnight
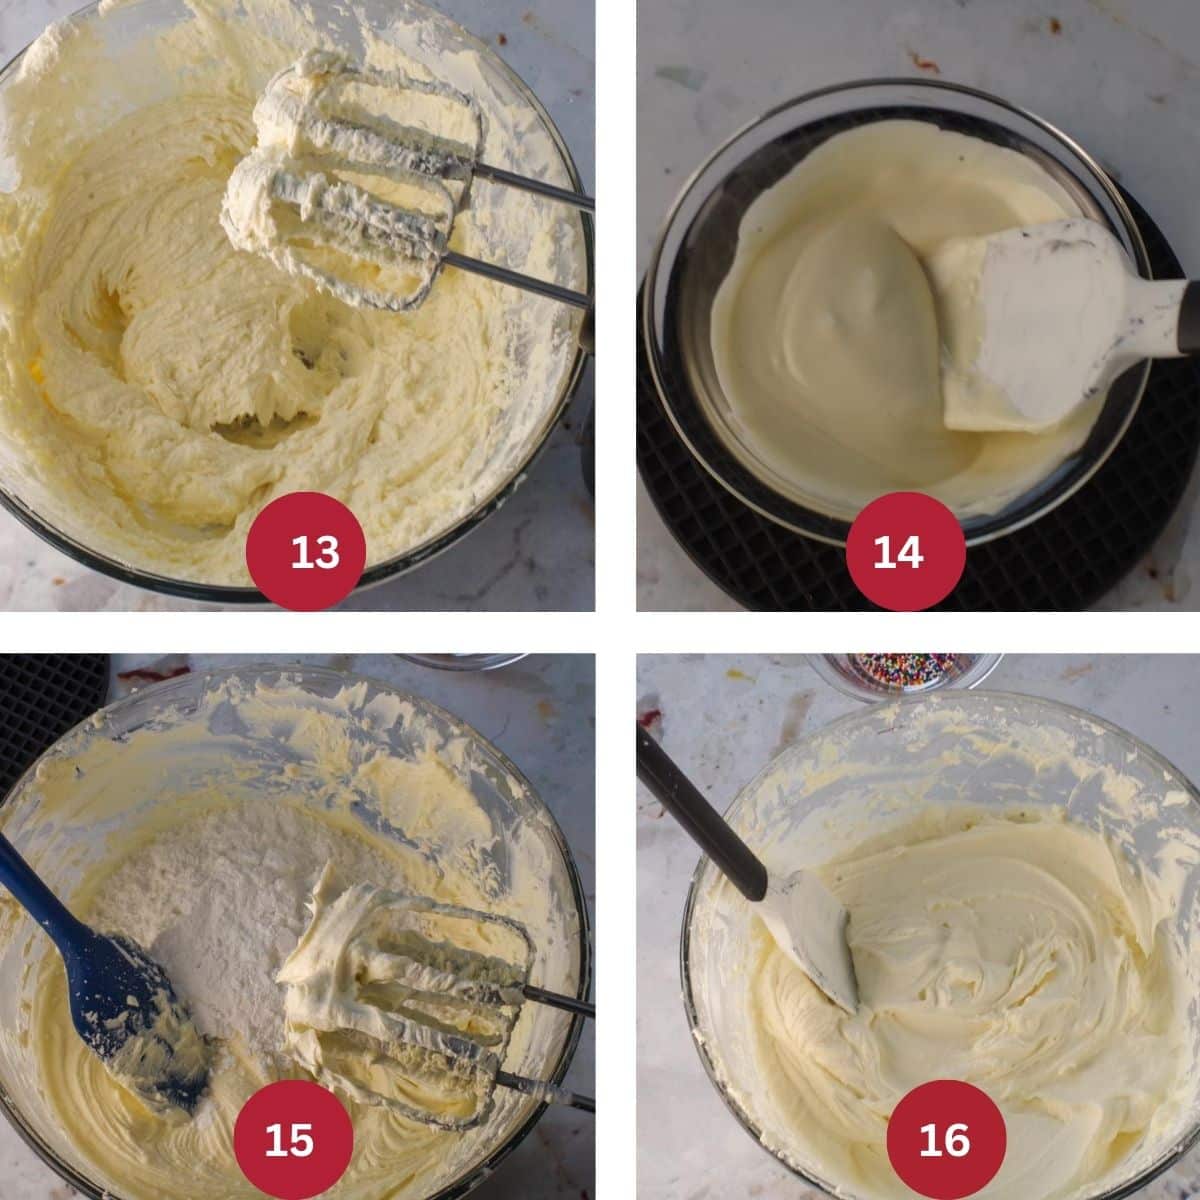
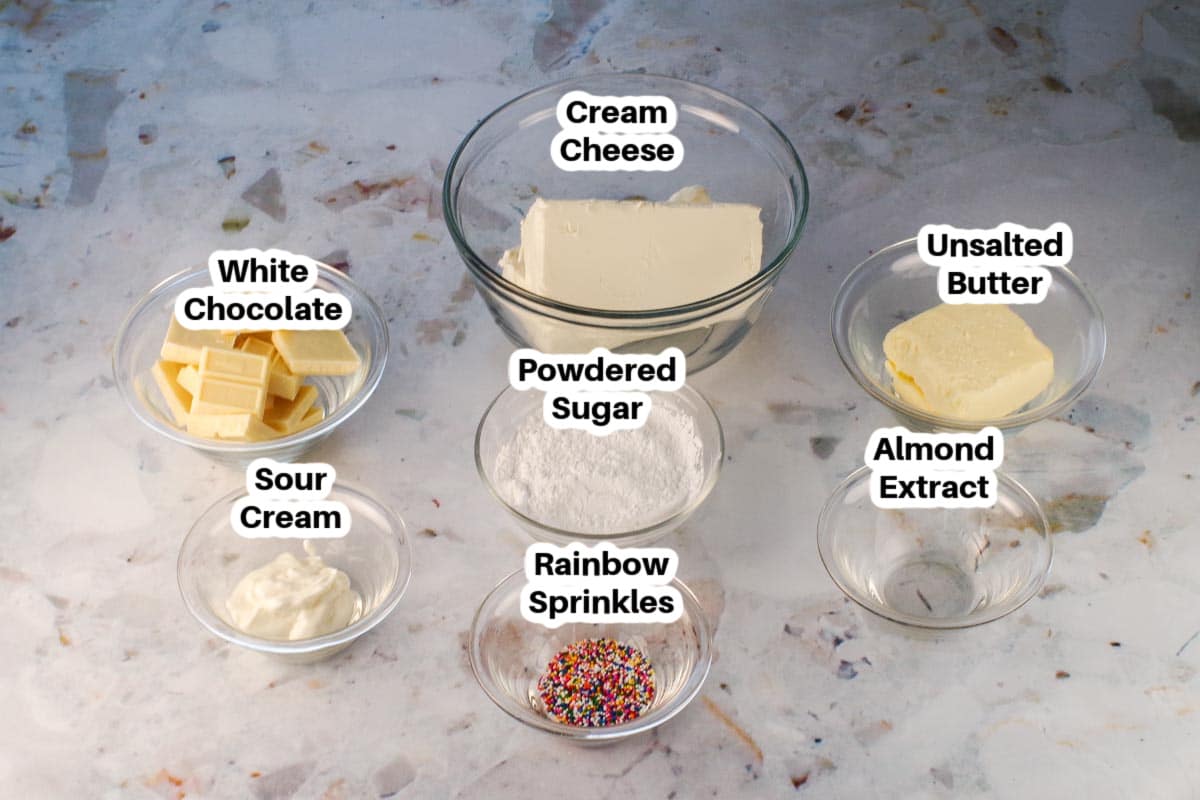
MAKE THE FROSTING (STEP 4): Mix the cream cheese, butter, and sour cream until smooth and creamy (IMAGE 13). Scrape down the sides. Melt the white chocolate: Heat the chocolate until almost completely melted. Use a small microwavable bowl, and melt at ½ power for 2 minutes, then stir with a silicone spatula after every 15 seconds until it's all melted. Or use the top of a double boiler set over hot, not simmering, water, stirring often-do not let the bottom of the container touch the water). **If you use the microwave, but sure to only heat it on ½ power (50%)! (IMAGE 14). Add the cooled melted white chocolate and mix until it is smoothly incorporated. Add the almond extract, then add the powdered sugar. IMAGE 15). Beat together with an electric mixer (IMAGE 16). The frosting must be refrigerated and it becomes more firm in the refrigerator. * Let the frosting sit out for about 30 minutes and come to room temperature before frosting the cake so it's easier to manage.
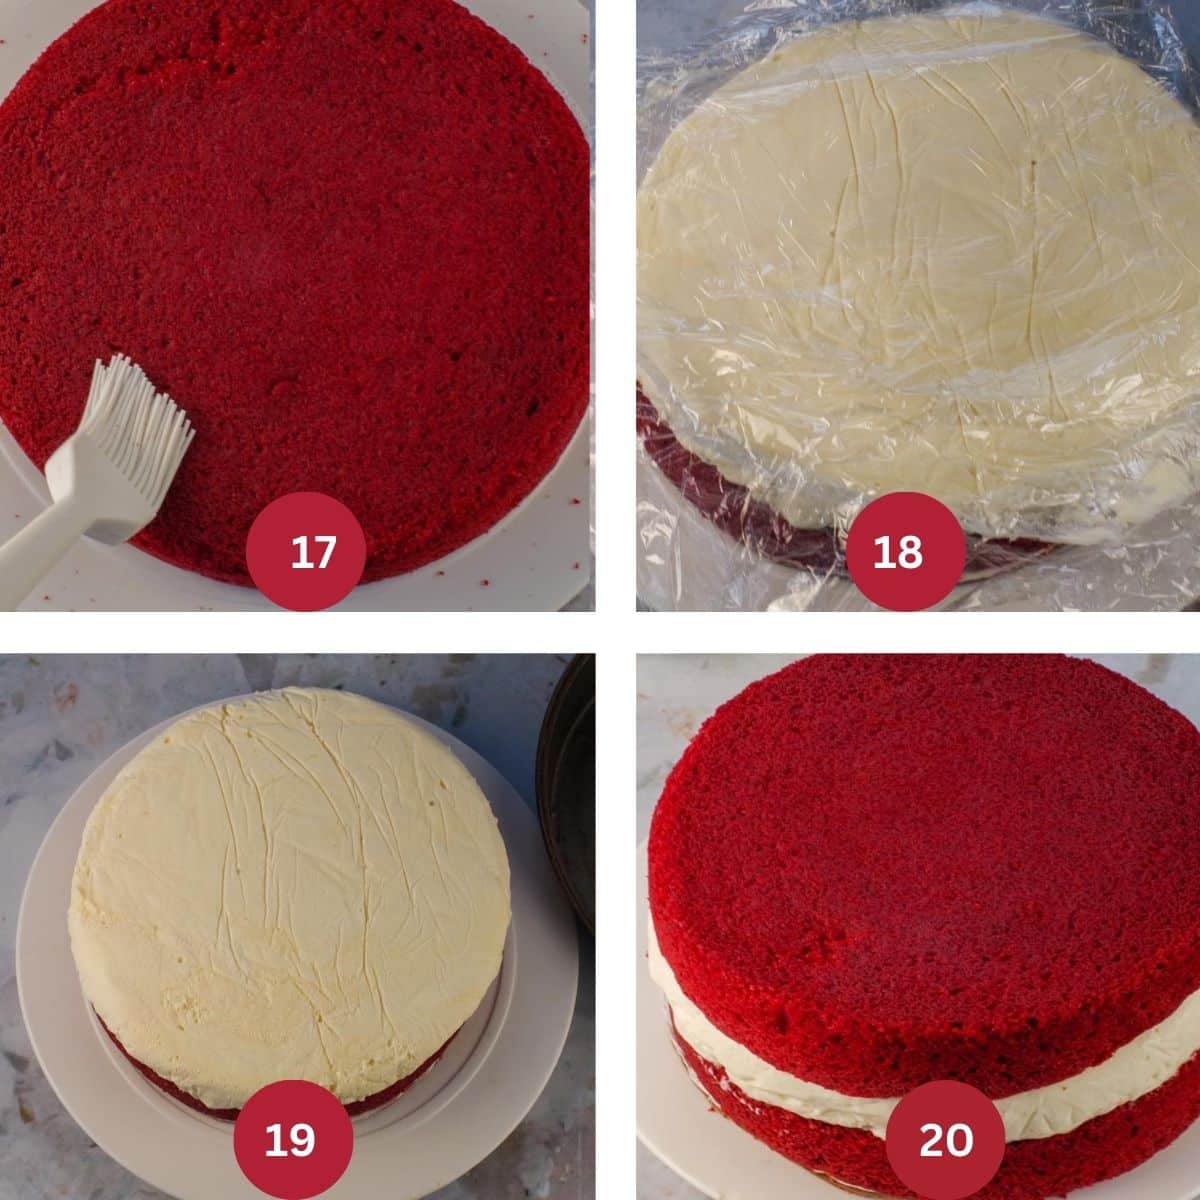
ASSEMBLE THE CAKE (STEP 5): Place one cake on a cake stand or cake plate, with the cut side down. *Use a pastry brush to brush away extra crumbs (IMAGE 17). Place the ice cream layer on the cake (IMAGE 18). Remove the plastic wrap from the ice cream layer (IMAGE 19). Add the other cake (cut side down) on top of the ice cream layer (IMAGE 20). *If the ice cream hangs over the edges of the cake, you can simply take a knife and trim that portion off, turning the cake as you hold a knife or spatula against it to trim excess ice cream.
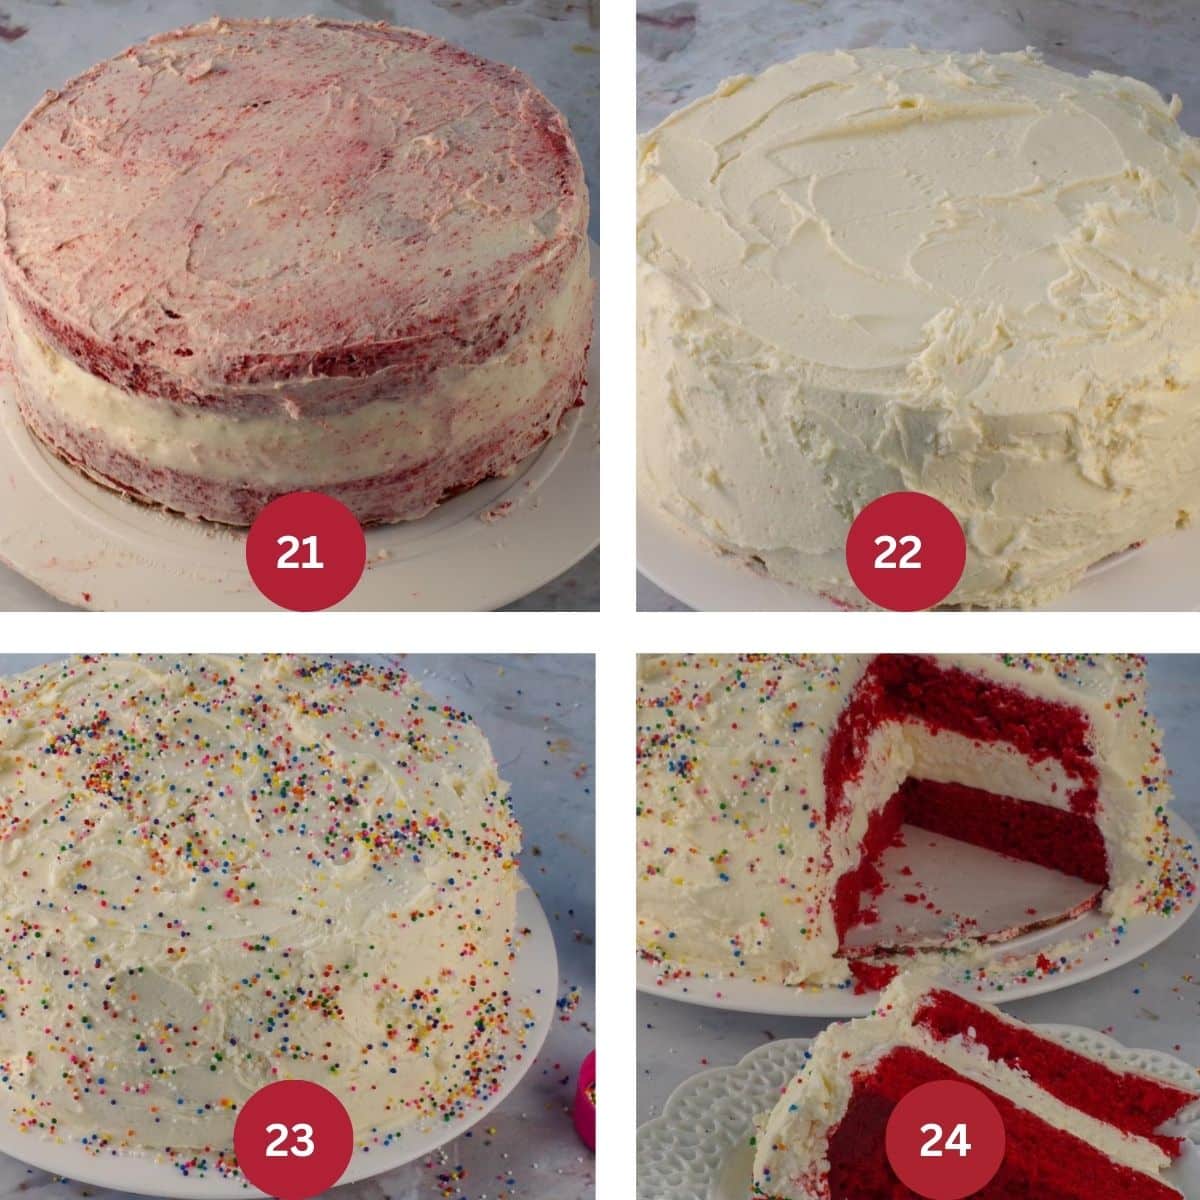
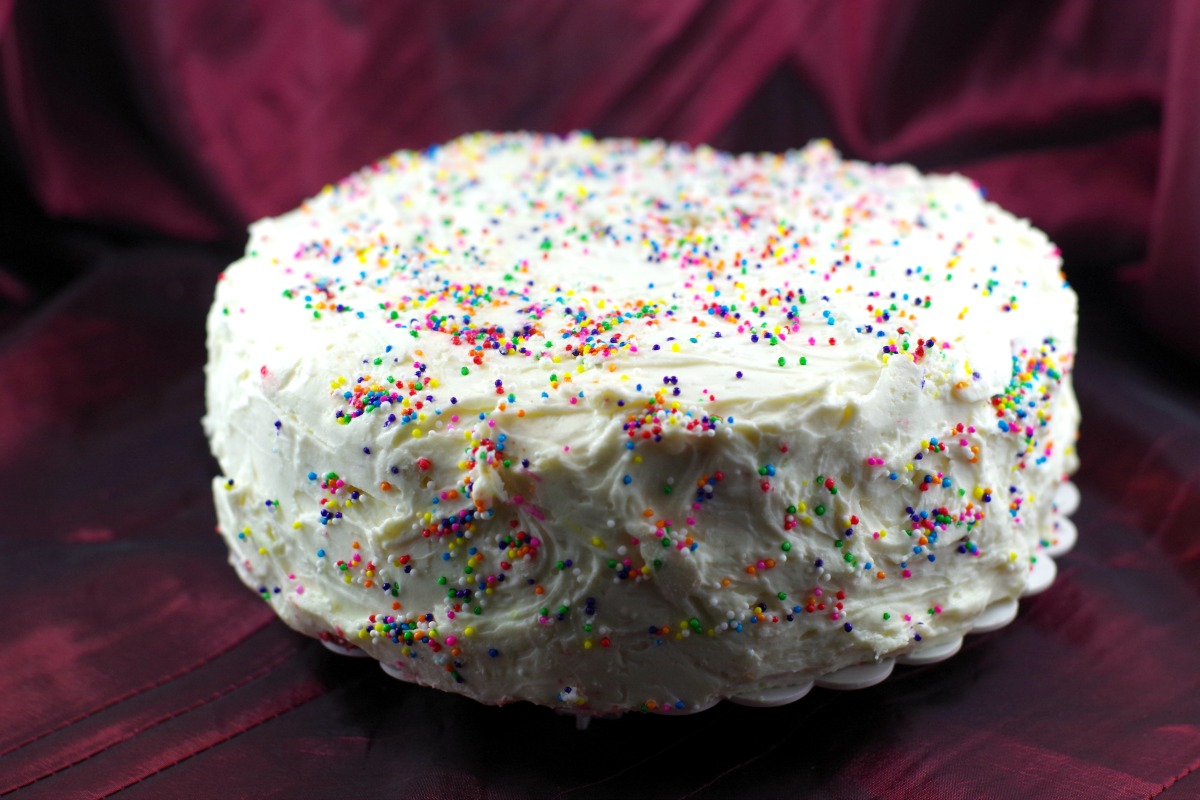
DECORATE THE CAKE (STEP 6): Crumb coat the cake (this helps to prevent crumbs from getting into your frosting) (IMAGE 21), then put it back in the freezer for 30 minutes. Frost the cake with dreamy creamy white chocolate cream cheese icing - make sure the frosting has been sitting at room temperature for at least 30 minutes or it will be too stiff to work with (IMAGE 22). Optional: You can also add a border around the cake with a pastry bag and a #21 star frosting tip. *The cake will be cold, so the frosting may stiffen up a little as you frost it. You can warm your knife or decorating spatula by running it under warm water, and then drying it off with a clean tea towel. Decorate, with rainbow round sprinkles (IMAGE 23). *For the sides, I put some sprinkles in the cap of the sprinkles bottle and tossed it at the sides of the cake to get them to stick. Freeze the cake until ready to serve (IMAGE 24). *You'll need to put it back in the freezer for at least an hour before serving.
🌡️Storing
This cake needs to be stored in an airtight container in the freezer!
No churn ice cream melts very quickly, so you're going to want to take it out only to decorate it, then again, to serve it.
Then get it back in the freezer asap and keep it there! The white chocolate cream cheese frosting freezes very well too.
This cake will freeze well for up to 2 months.
👪 Serving size
As is, this recipe will serve 12. However, if you prefer a multi-layer cake, then double everything (the cake, ice cream filling, and frosting). You can do this by clicking on the serving size in the recipe card. It will adjust all the ingredients accordingly.
❔Recipe FAQ's
Yes! If you're short on time or don't feel like making the no churn ice cream, you can use store-bought vanilla or cheesecake-flavored ice cream. Let it soften slightly, then spread it into the cake pan and freeze until solid before assembling the cake.
You can make this cake up to 2 months in advance. Just be sure to store it in an airtight cake container in the freezer to prevent freezer burn.
Let the cake sit at room temperature for about 5-10 minutes before slicing. This makes cutting easier while keeping the ice cream from melting too quickly.
If your frosting is too firm to spread, let it sit at room temperature for about 30 minutes. You can also stir it or whip it briefly to soften it up. Using a warm knife also helps to spread the frosting.
Yes, if you're short on time, you can use a boxed red velvet cake mix instead of making it from scratch. Just prepare it according to the package instructions and let the layers cool completely before assembling.
Make sure your cake layers are completely cool before assembling. You can also freeze the cake layers for 15-20 minutes before adding the ice cream to help keep everything firm. And work quickly! If you can't work quickly enough, stop and put everything in the freezer until it firms up enough to work with.
You can use store-bought or homemade ice cream for red velvet cake. Typically cream cheese, cheesecake, or vanilla ice cream are the best choices for pairing with red velvet cake.
So, if are looking for an easy red velvet cream ice cream cake and don't have an ice cream maker, this is THE ONE! I have made a lot of red velvet cakes and cream cheese frostings over my many years of cake baking and decorating and this is my chosen combination.
The no-churn ice cream is a cool and refreshing addition to my absolute favorite red velvet cake and cream cheese icing combo! And I did try to keep it easy - no fancy decorating required.
I used a cake spatula and a butter knife to make the cream cheese frosting swirl it a bit, then put some multi-colored sprinkles on and that was it!
So if you are looking for an amazing red velvet ice cream cake, give this one a try!
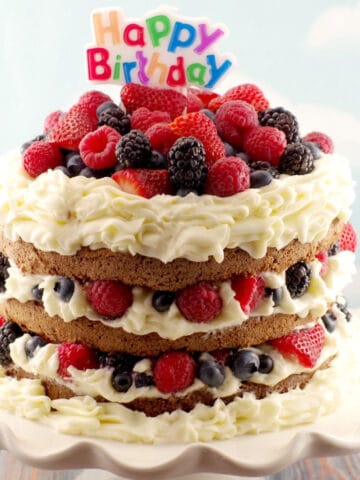
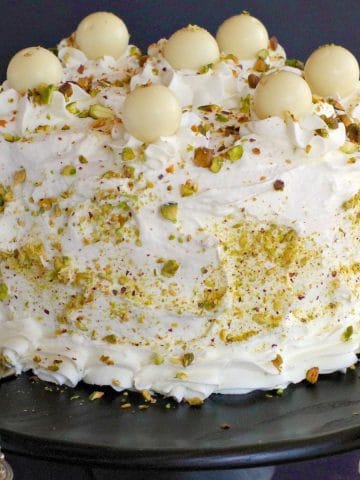
🎂 More Cake Recipes
Did your family❤️this recipe? Did you know that commenting and⭐rating recipes is one of the best ways to support your favorite recipe creators? If you LOVED this recipe, please comment and rate it in the recipe card or share photos on social media using the hashtag #foodmeanderings or tagging @foodmeanderings !

🍰 Red Velvet Ice Cream Cake Recipe
Ingredients
Red Velvet Cake
- 1-¼ cups all-purpose flour
- ¾ cups sugar
- ½ teaspoon baking soda
- ¼ teaspoon salt
- 1 teaspoon cocoa powder
- ¾ cups vegetable oil
- ½ cup milk room temp
- 1 large egg room temp
- 1 tablespoon red food coloring
- ½ teaspoon white vinegar
- ½ teaspoon vanilla
Cheesecake Ice Cream
- 2 oz cream cheese (about ¼ cup)
- 7 ounces sweetened condensed milk (½ of a 14 ounce can)
- 1 ½ cups whipping cream (aka heavy cream - 33% -36% fat)
Dreamy Creamy White Chocolate Cream Cheese Icing
- 6 ounces white chocolate baker's white chocolate, not chips
- 16 oz cream cheese, softened 2 (8 oz pkgs) or 2 cups
- ½ cup unsalted butter
- ¼ teaspoon almond extract
- 2 tablespoon sour cream
- ⅔ cup icing sugar/powdered sugar
- rainbow sprinkles any color/type you prefer
Instructions
Make the red velvet cake:
- * Heads up! There is a minimum 8 hour freezing time with this cake.
- Preheat oven to 350 degrees F. Prepare two 8" or 9" round pans. I use Wilton Cake Release to prevent sticking (see NOTES)
- Add vinegar to milk and let stand for 5 minutes.½ teaspoon white vinegar, ½ cup milk
- Sift all dry ingredients together into stand mixer bowl.1-¼ cups all-purpose flour, ¾ cups sugar, ½ teaspoon baking soda, ¼ teaspoon salt, 1 teaspoon cocoa powder
- In another large bowl whisk together all wet ingredients.¾ cups vegetable oil, 1 large egg, 1 tablespoon red food coloring, ½ teaspoon vanilla
- In the bowl of a stand mixer, using a paddle attachment or with an electric hand mixer, on low speed, blend the wet ingredients into the dry ingredients until just combined.
- Divide the cake batter between cake pans, filling ½ -⅔ full.
- Bake until tester inserted in center comes out clean (about 25- 30 minutes).
- When cake is done, cool for 10 minutes, then transfer to wire rack. Cool for another 15 minutes, then level the cake by slicing off the 'hump'.
Make the no churn cheesecake ice cream filling;
- In a large bowl, beat together the cream cheese and the sweetened condensed milk.2 oz cream cheese, 7 ounces sweetened condensed milk
- In a separate bowl, beat the whipping cream until it has stiff peaks. Gently fold the cream into the cream cheese mixture and stir until combined.1 ½ cups whipping cream
- Line an 8 or 9-inch baking pan with plastic wrap (*use the same size you used for the cakes!) Add the ice cream to the pan, smoothing out the top. Cover the top with plastic wrap and freeze until solid, at least 6 hours.
Make the dreamy creamy cream cheese icing:
- Melt the white chocolate: Heat the chocolate until almost completely melted. Use a small microwavable bowl, stirring with a silicone spatula every 15 seconds (or use the top of a double boiler set over hot, not simmering, water, stirring often-do not let the bottom of the container touch the water). **If you use the microwave, but sure to only heat it on ½ power (50%)6 ounces white chocolate
- Remove the white chocolate from the heat and, with the silicone spatula, stir until fully melted. Allow it to cool until it is no longer warm to the touch but is still fluid.
- Make the Frosting In your mixer (or with an electric hand mixer) : mix the cream cheese, butter and sour cream until smooth and creamy. Scrape down the sides. Add the cooled melted white chocolate and mix until it is smoothly incorporated.16 oz cream cheese, softened, ½ cup unsalted butter, 2 tablespoon sour cream
- Add the almond extract, then add the icing sugar. The frosting must be refrigerated and it becomes more firm in the refrigerator. Let it come to room temperature before frosting.¼ teaspoon almond extract, ⅔ cup icing sugar/powdered sugar
Assembly:
- Place one cake on a cake stand or cake plate. Remove the plastic wrap from the ice cream layer and place one layer on top of the cake.
- Add another cake. Frost the cake with dreamy creamy white chocolate cream cheese icing. Decorate, with rainbow round sprinkles. Freeze the cake until ready to serve.rainbow sprinkles
Notes
- Use High-Quality Food Coloring - Americolor Super Red or Wilton "No Taste Red" will give you a vibrant red hue without an unpleasant aftertaste. Avoid grocery store food coloring, as it requires too much to achieve the right color.
- Don't Overmix the Batter - Overmixing can lead to a dense cake. Mix just until the ingredients are combined for a light and fluffy texture.
- Cool Completely Before Assembly - Ensure your cake is fully cooled before adding the ice cream layer to prevent melting.
- Chill the Mixing Bowl - When whipping the heavy cream, chill your bowl and beaters to help achieve stiff peaks faster.
- Gently Fold - When mixing the sweetened condensed milk mixture with the whipped cream, use a light, delicate folding motion to maintain the airy texture.
- Don't Rush the Freezing Process - Let the ice cream freeze for at least 8 hours (or overnight) to ensure a firm consistency that holds up when assembling.
- Use the Same Pan Size - Line an 8-inch cake pan with plastic wrap for the ice cream layer. This ensures it matches the cake layers perfectly and makes assembly easier.
- Use High-Quality White Chocolate - A white chocolate baking bar (NOT white chocolate chips) melts more smoothly and blends better into the frosting.
- Let the Frosting Sit at Room Temperature - Since the frosting firms up in the fridge, let it sit for about 30 minutes before spreading for easy application.
- Crumb-free Frosting: I use Wilton Cake Release (affiliate link). The cakes come out of the pan without sticking, then I brush off any red velvet cake crumbs with a pastry brush before I frost it.
- Crumb Coat for a Clean Finish - Apply a thin layer of frosting first, freeze for 30 minutes, then frost fully to prevent red crumbs from mixing into the white frosting.
- Add a generous amount of frosting then spread- Another trick to avoid getting cake crumbs in your frosting is to work in sections, adding a generous amount of frosting to each section and spreading it from the top so your knife doesn't need to touch the crumb coat.
- Use a separate bowl - Always use a separate bowl for the frosting you are working with at that moment, as you can scrape off any crumbs that come into contact with your knife and you won't accidentally add crumbs to the main container of frosting.
- Warm Your Knife for a Smooth Finish - Run your spatula or knife under warm water, dry it, and use it to smooth the frosting for a polished look.
- Work Quickly When Decorating - Ice cream melts fast, so frost and decorate the cake efficiently, then return it to the freezer immediately.
- Let It Sit for 5 Minutes Before Serving - This allows the ice cream to soften just enough for easier cutting and eating.
- Use an Airtight Cake Container - This prevents freezer burn and keeps the cake fresh.
- Slice with a Warm Knife - Dip a knife in hot water, wipe dry, and slice for clean, even cuts.


Jessica Formicola says
Red velvet cake is my favorite, and add ice cream to it? My perfect dessert!
Terri Gilson says
I know, hey? All in one!
Tisha says
This would be perfect for a birthday party! I love redvelvet cake!
Terri Gilson says
Thanks, Tisha! Yes, it went over well at the birthday party1
Natalie says
What a genius idea making a red velvet ice cream cake! Looks and sounds so delicious!
Terri Gilson says
Thank you! Yes, my son loved it!
Patricia @ Grab a Plate says
How lovely! I totally understand, because I'm a planner, too! Glad this delicious ice cream cake worked out - it looks so good!
Terri Gilson says
Thanks, Patricia. I'm glad it did too but unfortunately, I had to make another one.
Scott Alan Walker says
주세요 달콤한 그 맛 ice cream cake
특별해질 오늘에 어울리는 맛으로
---Red Velvet, "Ice Cream Cake"
Sorry, had to put that here as this combination has been so well immortalized in song. This recipe looks almost as much of a guilty pleasure as the Korean girl group.
Terri Gilson says
Thanks Scott?!
Terri Gilson says
Thanks Scott!
Charlotte says
Red velvet AND ice cream? oh my goodness I need this in my life right now 🙂
Terri Gilson says
Hope you get a chance to try it, Charlotte! I'm so glad I brought it into my life....
cakespy says
This makes me want to weep about how much beauty and deliciousness there is in the world. You are a genius for this ice cream cake recipe. 😉
Terri Gilson says
Thanks so much!It was super yummy and most importantly, my son loves his Plan A birthday cake!
Terri Gilson says
Thanks so much!