


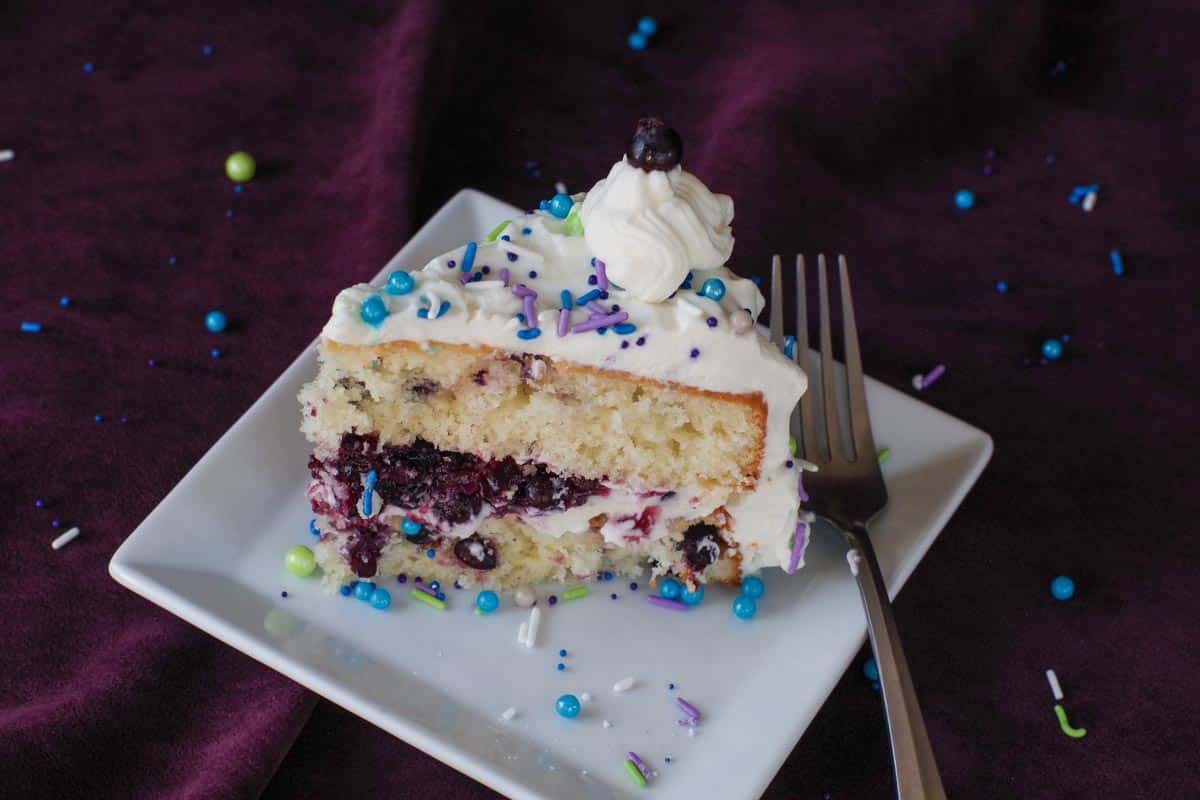
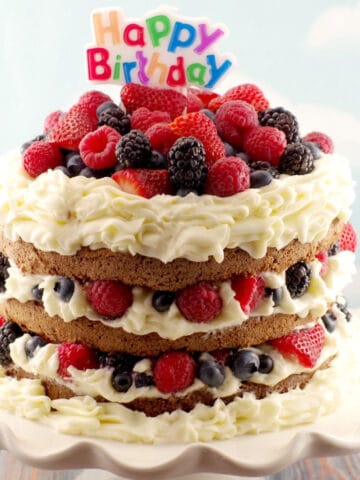
This Saskatoon Berry Cake is a scrumptious layer cake that celebrates summer with every bite! Bursting with a delicious Saskatoon berry filling, more Saskatoon berries in the batter, and a creamy whipped cream frosting, this cake will leave you begging for more!
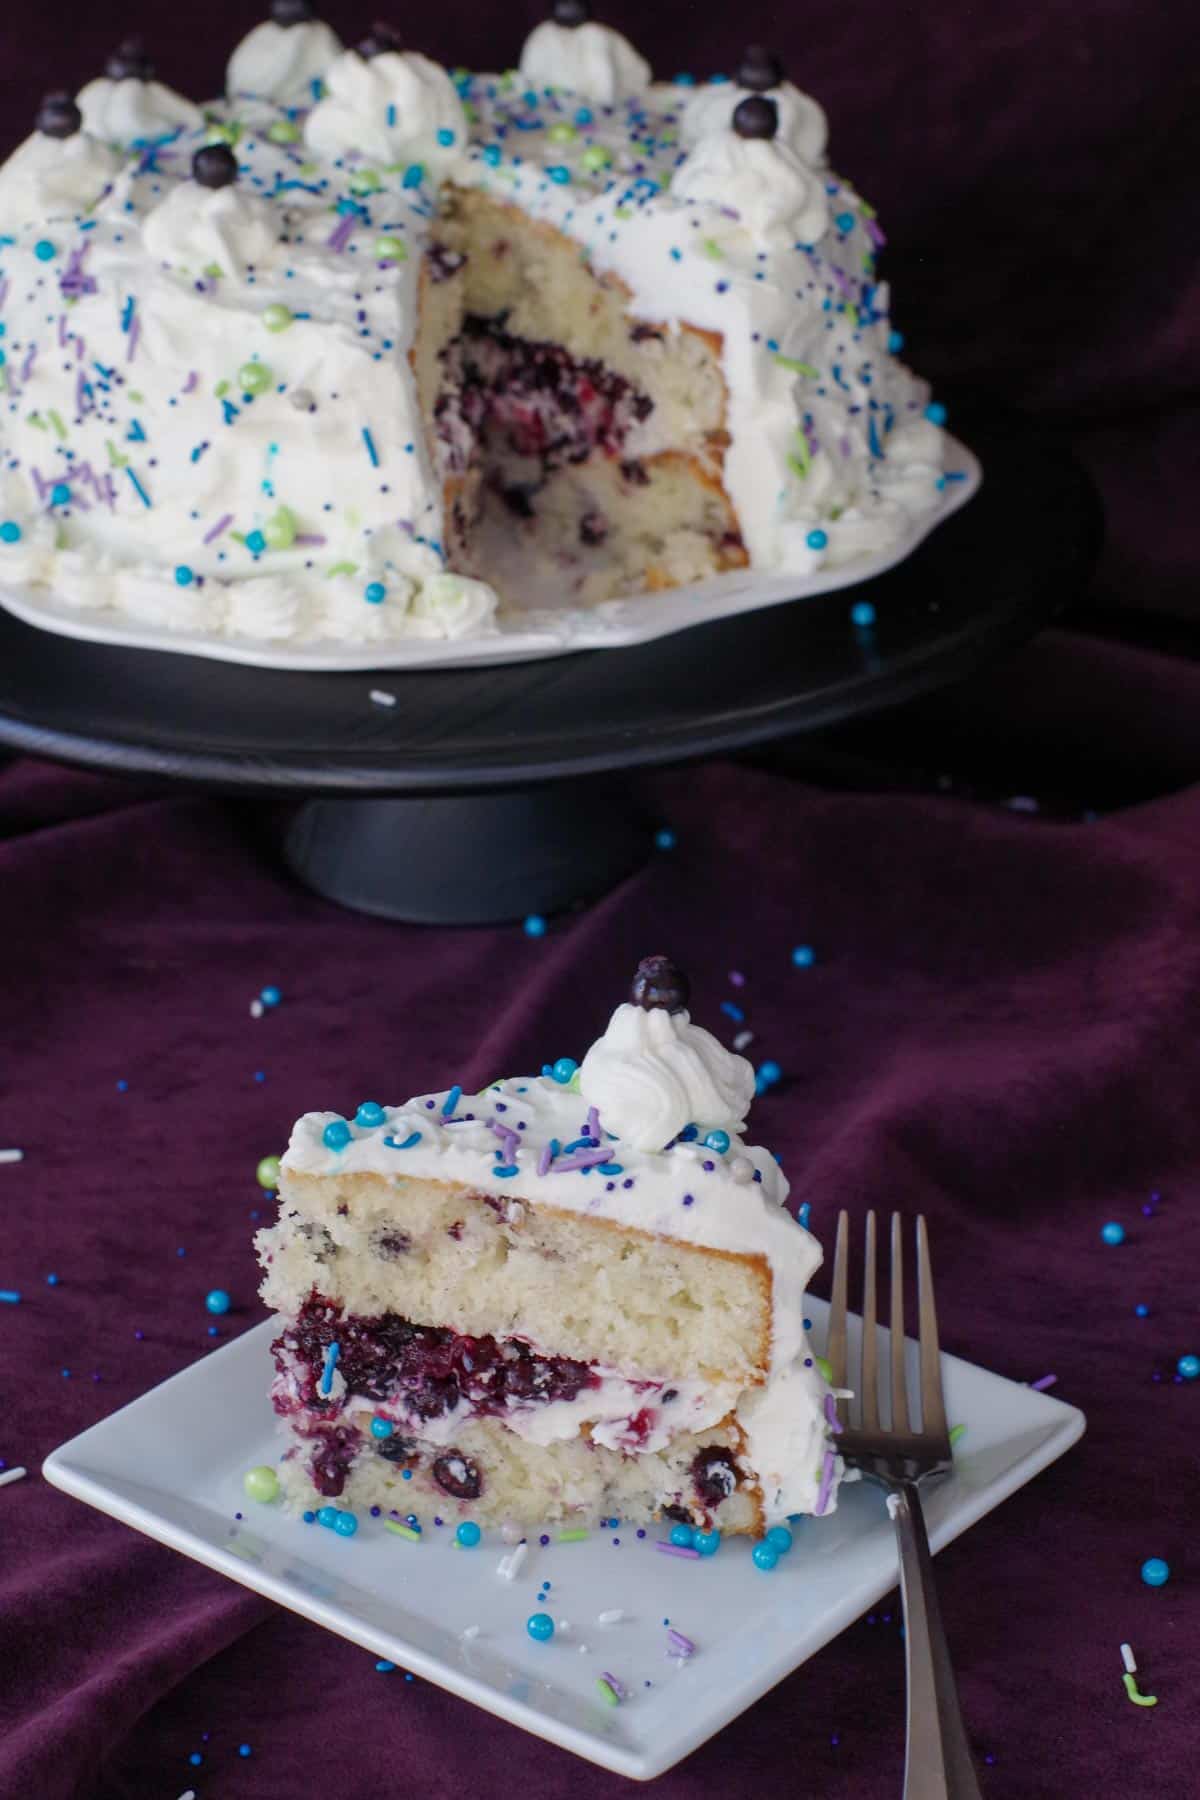
This Saskatoon berry cake is popular during Saskatoon berry season, which is a short season during the summer, and only a few weeks long (in mid-July to early August, depending on where you live). This cake is ideal for birthdays, celebrations, BBQs, and special occasions. This Saskatoon cake was inspired by my love for Saskatoon berries and my Saskatoon berry pie and filling.
If you love Saskatoon berries, be sure to try some of my other Saskatoon berry recipes: Saskatoon berry pancakes, Saskatoon berry cookies, Saskatoon berry loaf, Saskatoon berry cheesecake, Saskatoon berry dessert shooters, Saskatoon berry dessert perogies, Saskatoon berry ice cream (shown), and the best Saskatoon berry muffins (dairy-free)!
🥘Ingredient Notes
For this Saskatoon berry cake recipe, you'll need:
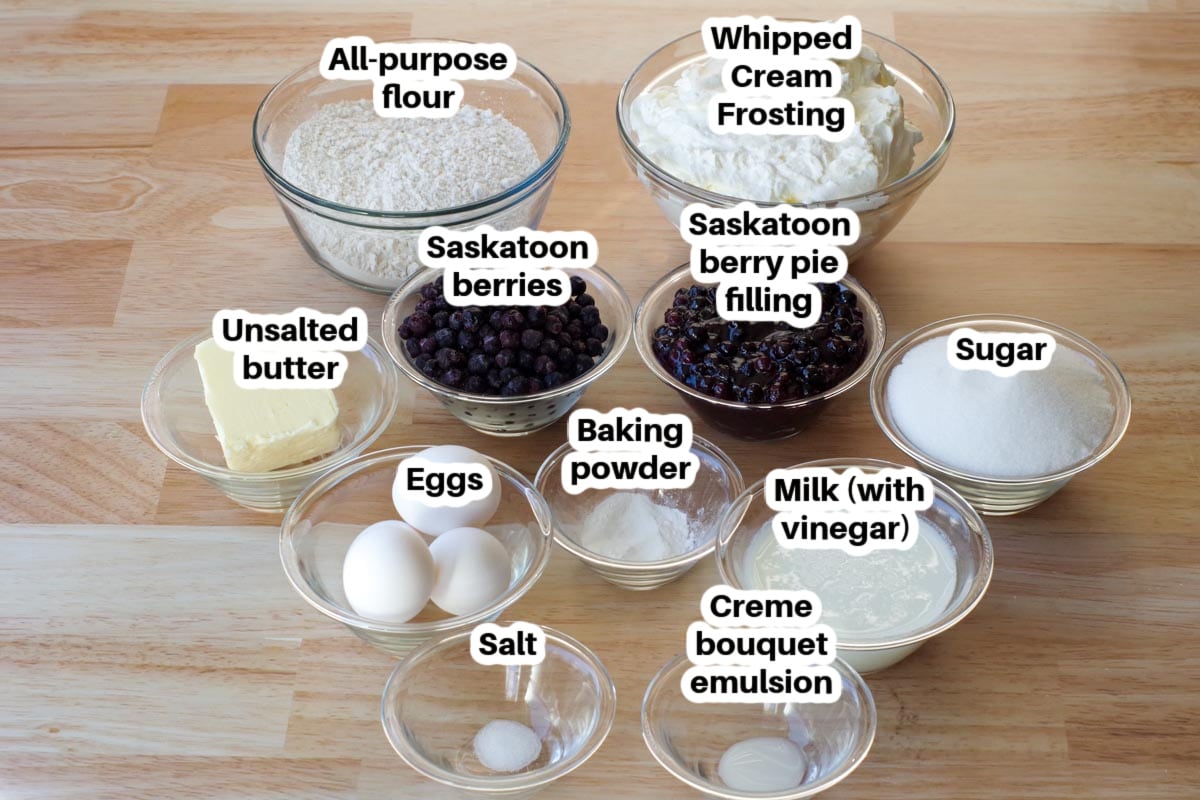
- Unsalted butter. I use unsalted butter so I can control the salt content in my baking. The salt content in salted butter varies by brand.
- Eggs (at room temperature). Ideally, you want your eggs at room temperature because they mix better with the batter and help the cake to rise easily.
- 'Light Buttermilk (homemade)': Mixing 1 cup milk with 1 tablespoon white vinegar is a simple way to mimic buttermilk without having to buy it or add the additional calories.
- Creme bouquet or Vanilla butter or Princess cake, and cookies emulsion. (affiliate link).If you haven't ventured into emulsions yet, I would highly recommend them! Emulsions give more depth of flavor, compared to using an extract, especially when they are baked in. "Princess Cake and Cookie Emulsion" (which is awesome in sugar cookies and frosting, too) is another one of my favorites, as well as Vanilla Butter. These generally aren't available at grocery stores but can be ordered online or purchased at hobby stores, craft stores, or anywhere that sells cake decorating supplies.
- Saskatoon berries. You can use fresh or frozen Saskatoon berries (defrosted).
- Saskatoon berry filling. My Saskatoon berry pie filling and sauce work perfectly as a filling for this cake!
- Stabilized Whipped cream frosting. I pair my whipped cream frosting with the recipe because it's a lighter frosting and complements the richness of this cake.
- Sprinkles. I bought these sprinkles at Bulk Barn, but you can use any blue or purple sprinkles mixture.
*Please see recipe card for full list of ingredients and quantities.
📖Variations & Substitutions
- Saskatoon berry pie filling- you could use canned Saskatoon Berry pie filling (affiliate link). instead of homemade Saskatoon berry pie filling. You'll need to use the whole 19 oz/540 ml can of pie filling. It's available at Co op in Western Canada or on Amazon. Alternatively, you can make this filling with blueberries or buy blueberry pie filling.
- Creme Bouquet emulsion - you can substitute Princess Cake and Cookies emulsion or Vanilla Butter emulsion, but if you can't get emulsion, use 2 teaspoon Vanilla extract.
- Frosting- you could use another type of frosting, such as my 2-ingredient White Chocolate frosting or my Whipped Cream Buttercream frosting, your own favorite, or store-bought frosting
- Sugar - you can substitute half brown sugar for the white sugar
🔪Step-by-Step: How to Make Saskatoon Berry Cake
Prep:
- Preheat oven to 350 degrees ( 176 degrees C) and put oven rack into the center of the oven.
- Prepare Saskatoon berry filling *you will only need HALF so you can either make the whole thing and freeze half or make half the recipe - this can be done in advance, and refrigerated or frozen.
- Prepare Whipped cream frosting - this can be done a day or two in advance.
- Add 1 tablespoon vinegar to the milk and set aside.
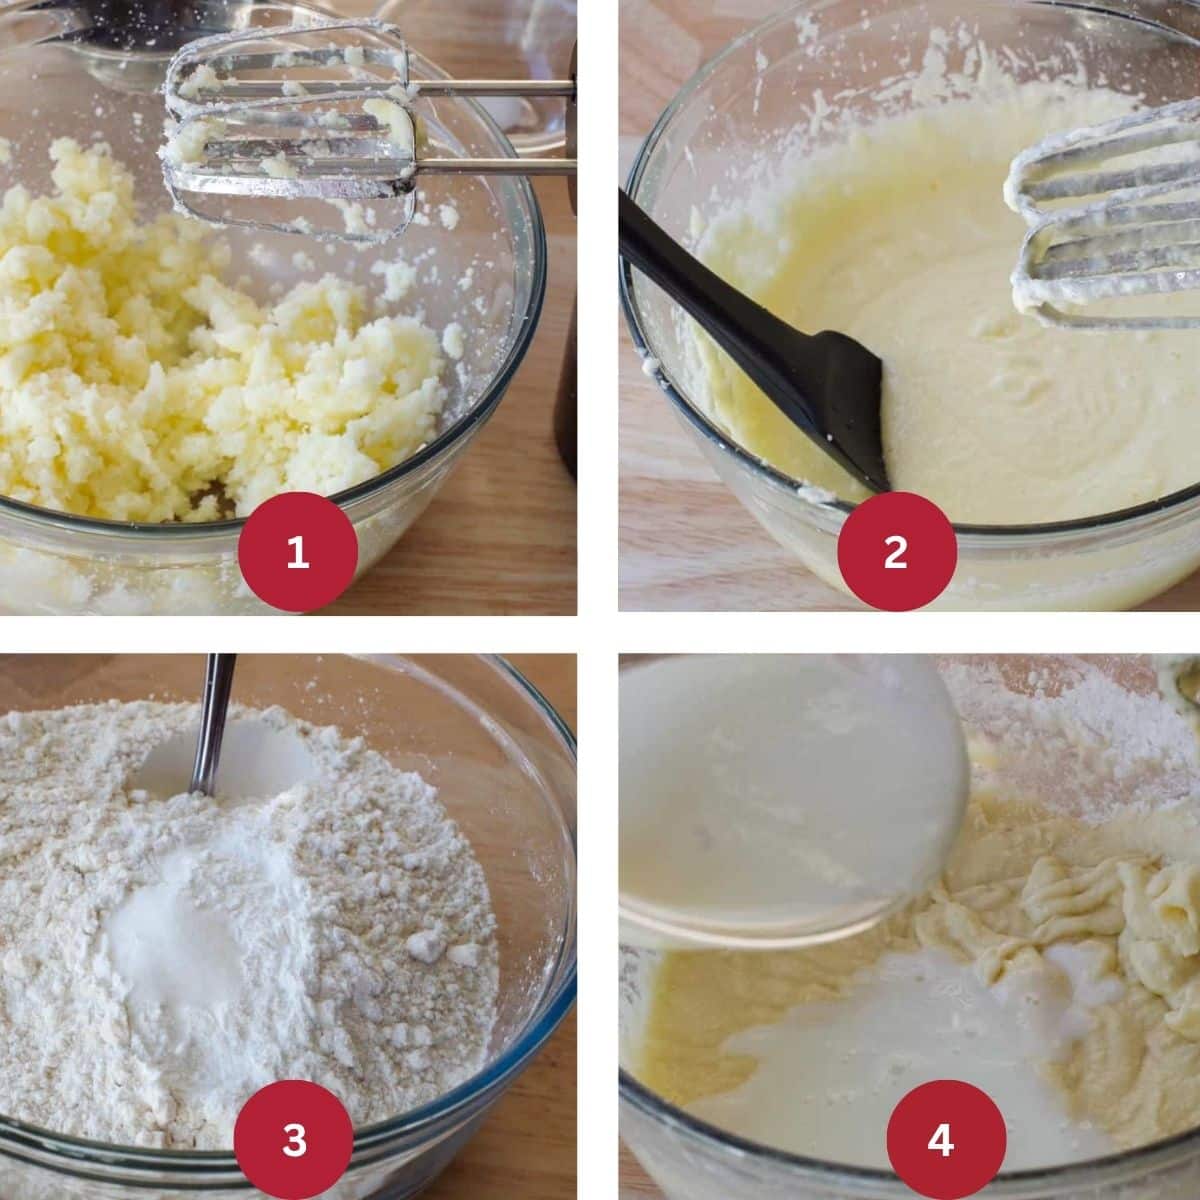
MAKE THE CAKE BATTER (STEP 1): Cream butter and sugar together until fluffy, about 3 minutes (IMAGE 1). Add eggs one at a time, beating well after each. Mix the Creme bouquet or whatever emulsion you use (or Vanilla extract) into the milk (IMAGE 2). Mix the dry ingredients together in a separate bowl (IMAGE 3). Combine the flour mixture with the butter/sugar/eggs in two parts, alternating with the milk mixture, beating well after each addition. (IMAGE 4).
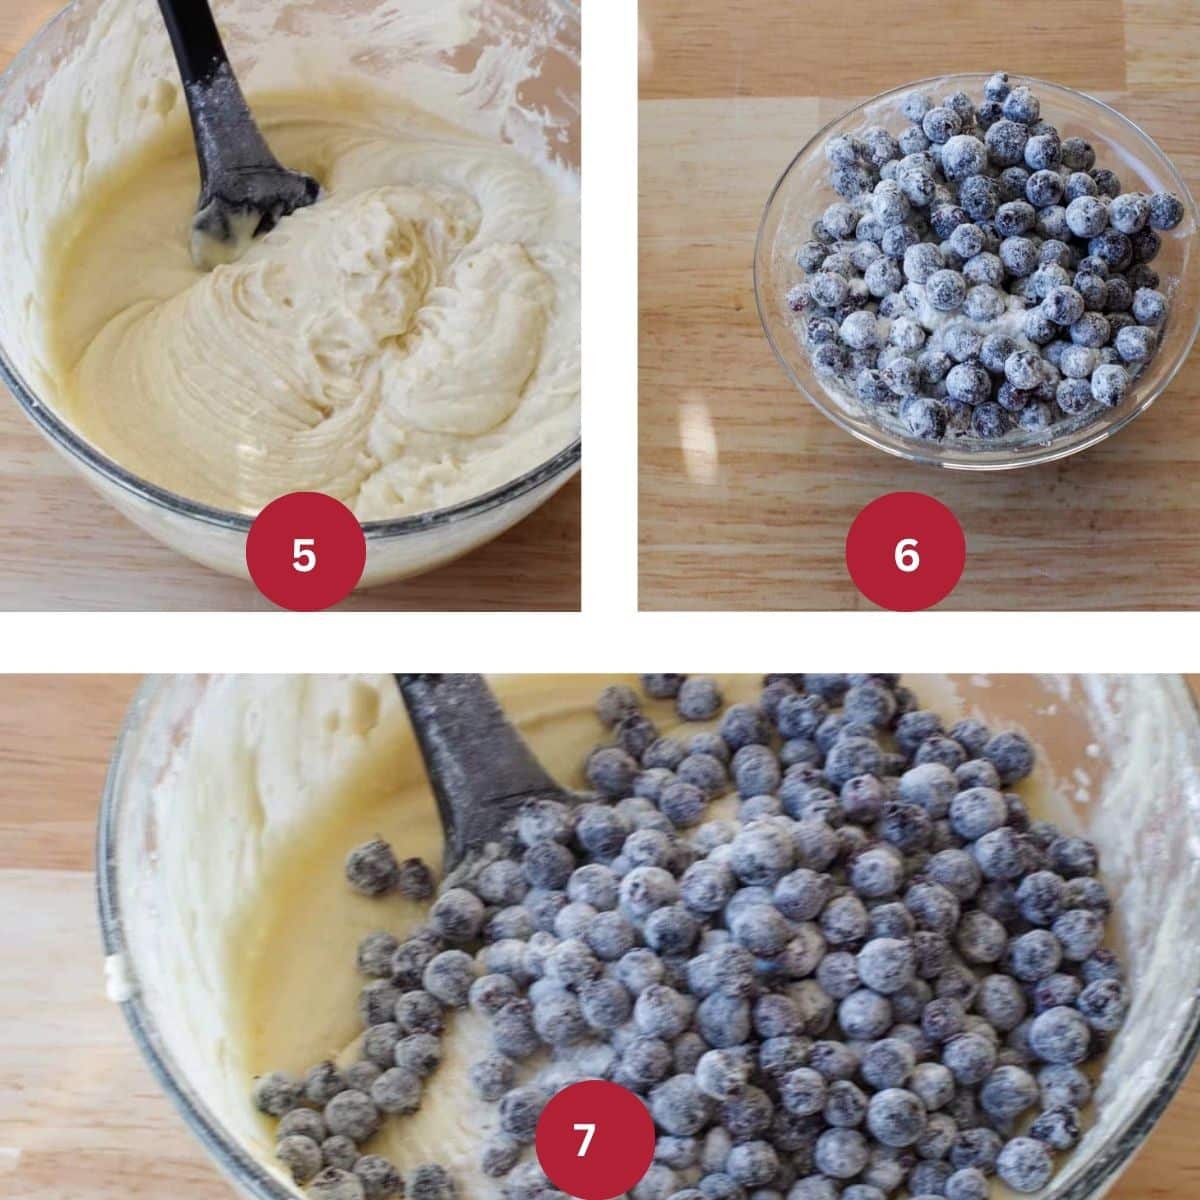
MAKE THE CAKE BATTER (STEP 2): Mix with an electric mixer, until combined (IMAGE 5). Mix Saskatoon berries with flour (IMAGE 6). Fold gently into the batter until just combined (don't stir too much or you'll get purple batter) (IMAGE 7).
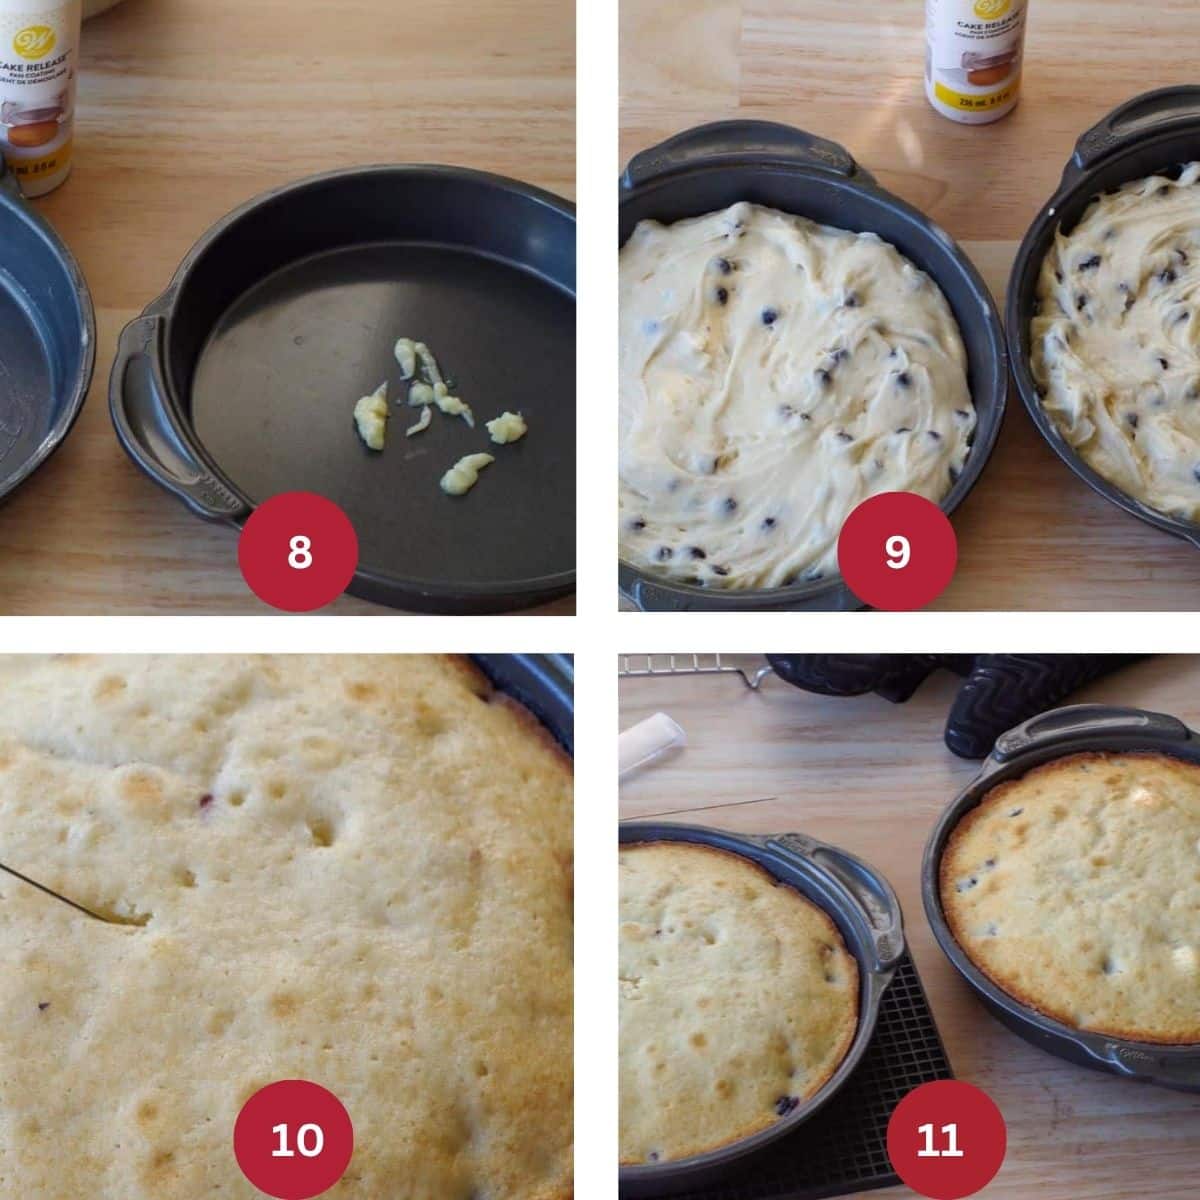
BAKE THE CAKE (STEP 3): Grease pans (9X13, 3=8″, 2=9″, or 1=10″) I use Cake Release (affiliate link) (IMAGE 8). Divide cake batter into prepared pans to ⅔ full (IMAGE 9). Bake in preheated oven at 350 degrees F for 25 - 40 minutes (depending on the pans you use), or until a cake tester inserted into the center of the cake comes out clean and the cakes will be golden brown on the edges and bottom.* It took 40 minutes in 2- 9-inch pans (IMAGE 10). Let cool in pans for 10 minutes (IMAGE 11).

COOL & LEVEL FOR DECORATING (STEP 4): Cool cake on wire rack for at least 10 minutes (IMAGE 12). To level cake: Flip over and slice off the dome on each cake with a sharp knife or wire cake leveler (IMAGE 13). Place the sliced side face down on a serving plate (IMAGE 14).
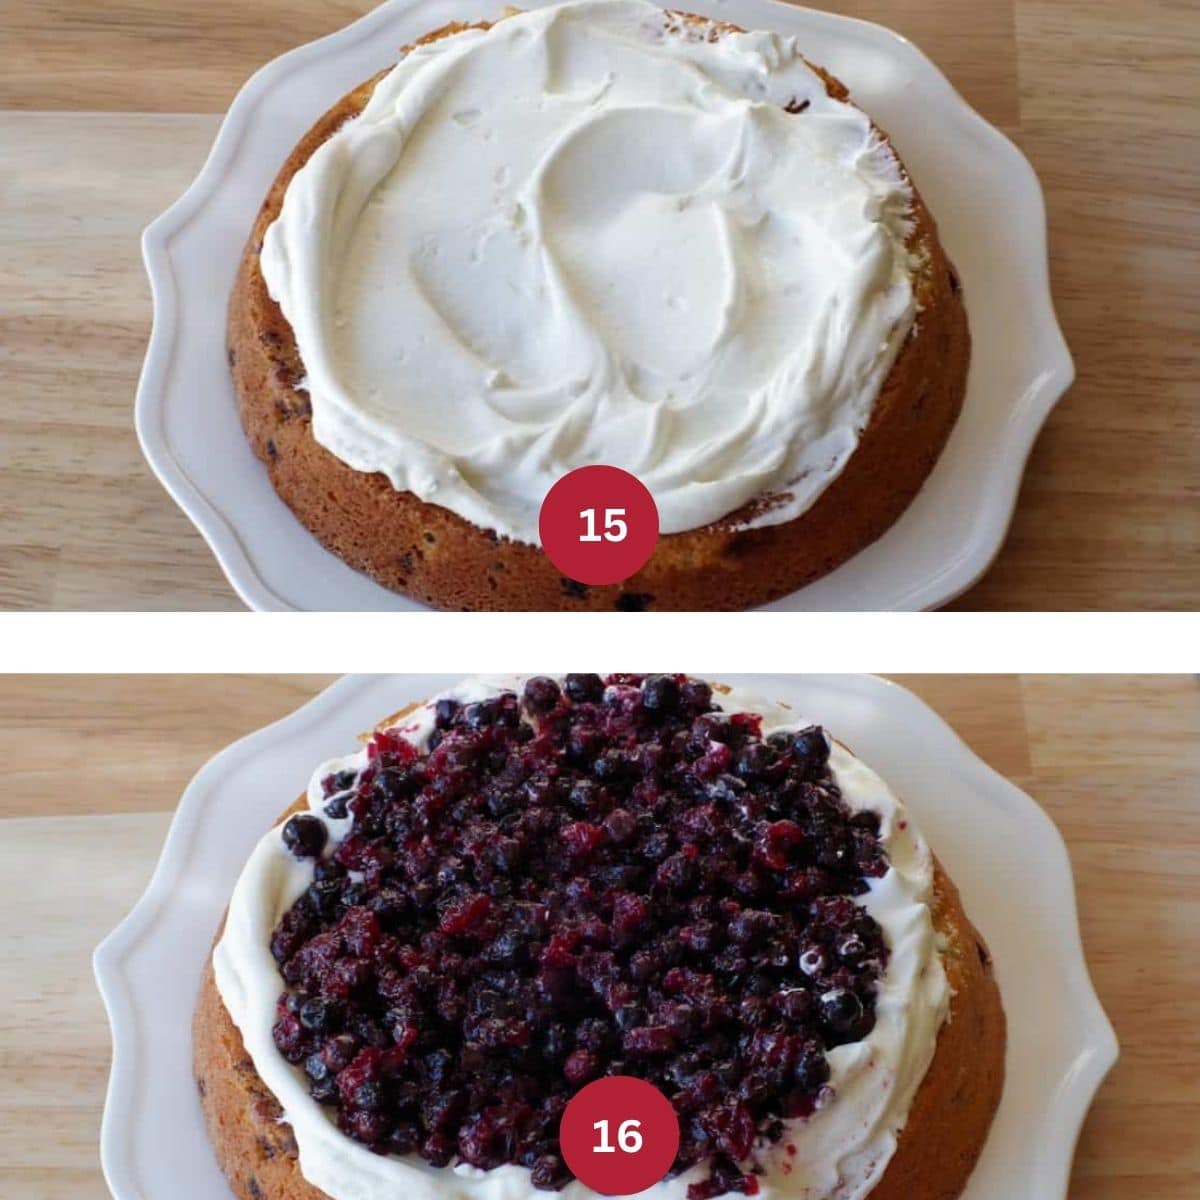
FILL THE CAKE (STEP 5): Add about 1 ¼ cups whipped cream frosting (IMAGE 15). Add the Saskatoon berry mixture to the top of the whipped cream frosting-covered cake. *Do not go all the way to the edge or the filling will seep out; leave about ½ an inch, as shown (IMAGE 16).
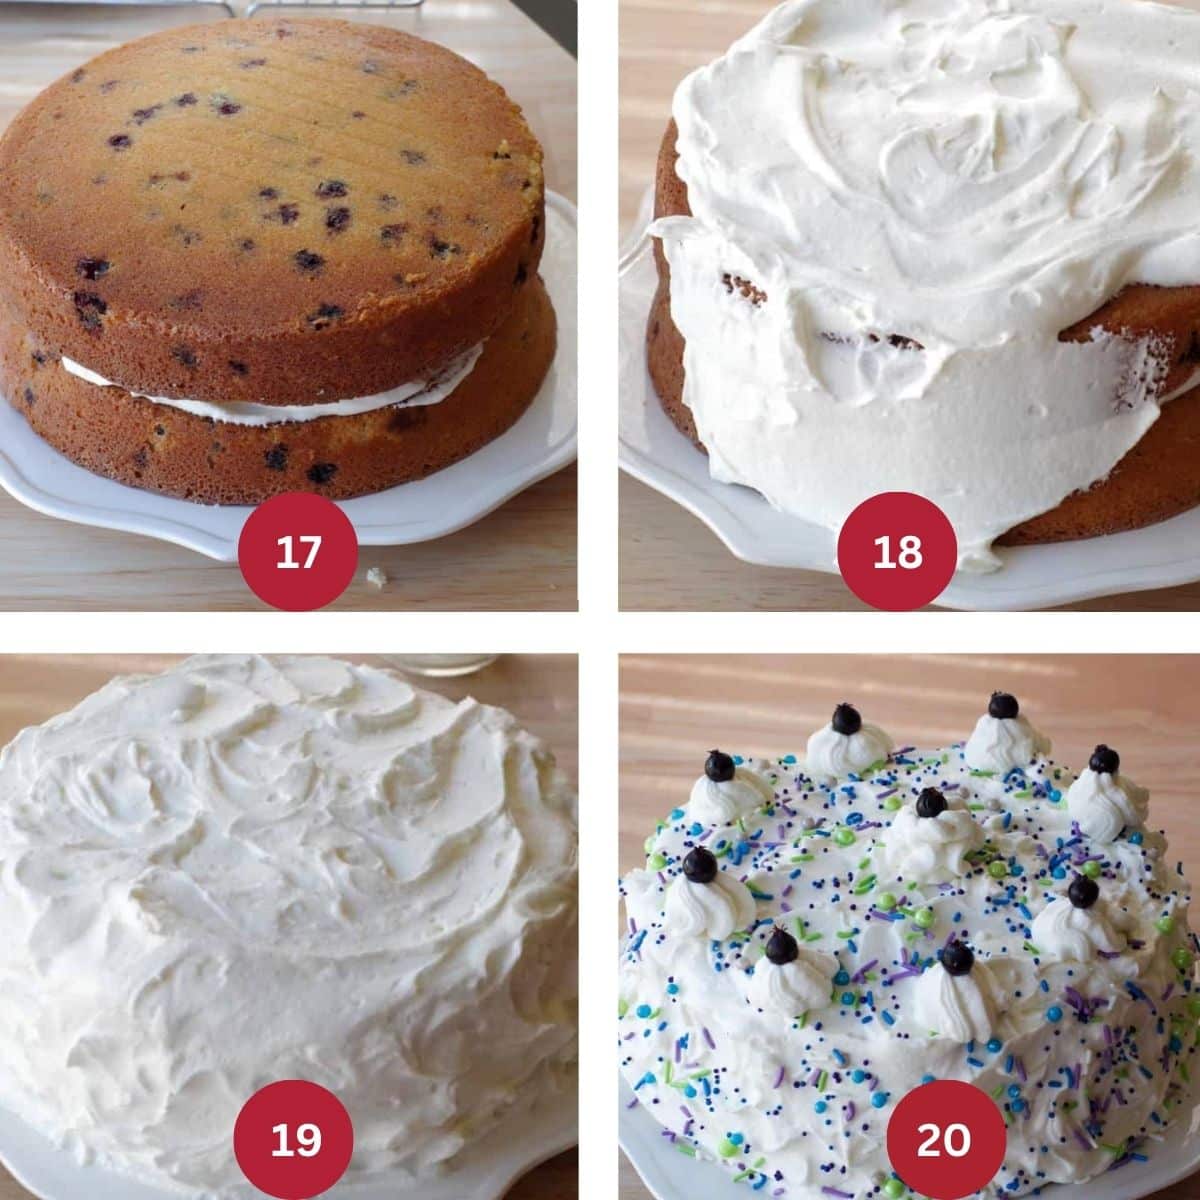
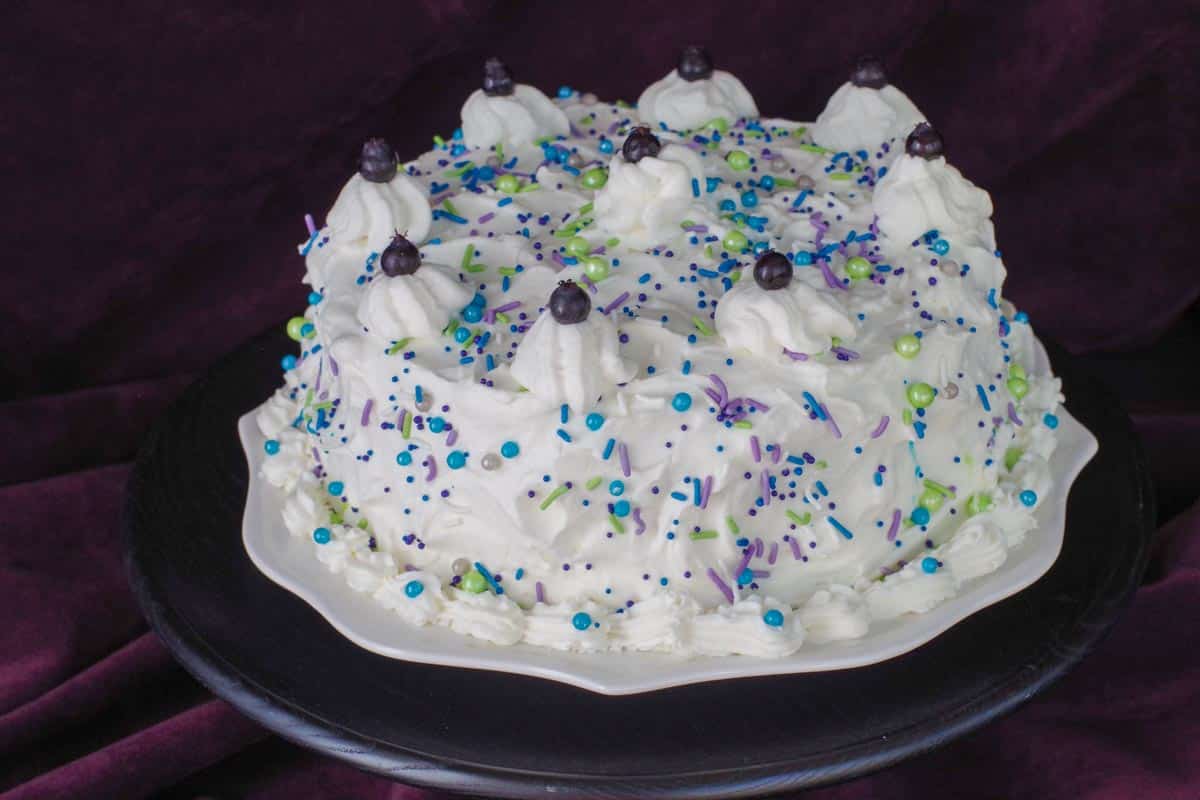
ASSEMBLE, FROST AND DECORATE THE CAKE (STEP 6): Put the 2nd cake on top (cut side down)(IMAGE 17). Frost the cake with whipped cream frosting. *To avoid getting crumbs in the frosting, put a thick patch on, then spread it, then repeat. (IMAGE 18). Continue frosting until the cake is covered. (IMAGE 19). Decorate cake: Add sprinkles and piping, and place Saskatoon berries on top of piped frosting decorations. Add a piped border around the bottom of the cake. *How to pipe a border on a cake *How to pipe decorations on a cake (IMAGE 20).
Expert Recipe Tips
- Use Cake Release for Easy Removal. For a crumb-free, professional-looking cake, use a generous amount of Cake Release (affiliate link). This ensures the cakes come out of the pans cleanly without sticking or tearing.
- Brush Away Loose Crumbs Before Frosting. Gently use a pastry brush (affiliate link) to remove any loose crumbs before frosting the cake. This helps you achieve a cleaner finish and reduces the chances of crumbs showing through the frosting.
- Prevent Crumbs in Your Frosting. To avoid crumbs mixing into your whipped cream frosting, apply a thick patch of frosting to an area of the cake, then spread it without touching the surface of the cake, and repeat. Here's how to frost a cake without getting crumbs in the frosting! You can also do a thin crumb coat to start
- Do a Crumb Coat (Optional for Extra Neatness). If you want a truly flawless finish, apply a thin layer of frosting over the entire cake (crumb coat) and refrigerate it for 30 minutes before adding the final layer of frosting. This traps stray crumbs and creates a smooth base.
- Toss Berries with Flour First. Mix your Saskatoon berries with a bit of flour before folding them into the batter. This keeps them from sinking to the bottom of the pan during baking and distributes them evenly throughout the cake layers.
- Cool Completely Before Decorating. Always let your cakes cool completely on a wire rack before assembling and decorating. Warm cake layers can melt the frosting and cause it to slide or weep.
- Chill Your Tools and Ingredients for Frosting. For best results when working with whipped cream frosting, chill your mixing bowl and beaters, and keep your frosting cold before decorating. This helps it whip up firmer and hold its shape better during piping and decorating.
- Leave Room for the Filling. When adding the berry filling between the layers, don't spread it all the way to the edge. Leave about a ½-inch border to prevent it from seeping out when you press down the top cake layer.
- Level Your Cakes for Stability. Use a serrated knife or cake leveler to slice off any domed tops from your cake layers so they sit flat. This gives you a more stable cake and cleaner appearance when frosting and slicing.
- Don't Overfill the Pans. Fill your cake pans no more than ⅔ full to avoid overflow and ensure even baking. Overfilled pans can result in domed or sunken centers.
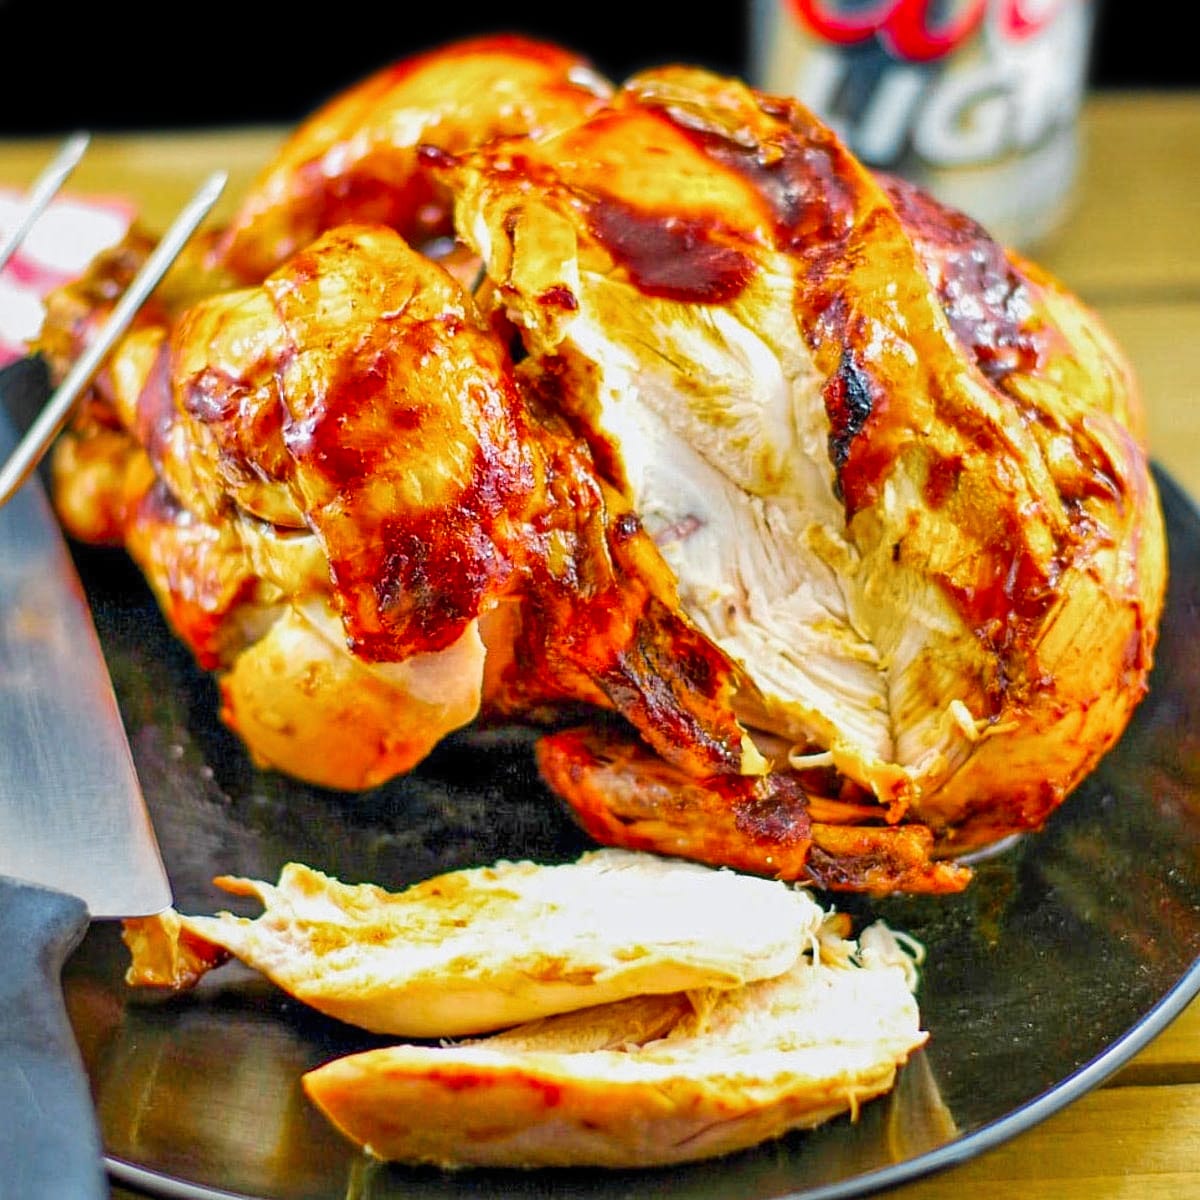
🥗 Main Dishes to serve with this Saskatoon Cake
Saskatoon cake goes well with so many summer meals! If you're in the mood for grilling, it pairs perfectly with my Grilled Steak Salad, Grilled Chicken Caesar Salad, or this BBQ Beer Butt Chicken (shown)!
If you're looking for a more 'hands-off' meal or need to feed a crowd, then try my Slow Cooker Pork Pineapple Carnitas or Slow Cooker Beef on a Bun!
👪 Serving Size
This Juneberry cake recipe makes 12 servings. However, you can double or triple the recipe by clicking on the serving number and selecting the number of servings you'd like. The ingredient quantities will automatically adjust. You will need additional pans if you increase the recipe.
🌡️Storage
Store this cake in an airtight container in the fridge for up to 4 days. It does not freeze well as a decorated cake (the whipped cream frosting will run when it defrosts).
Can I make this cake ahead of time?
Yes! The cake layers and berry filling can be made and frozen separately ahead of time (for up to 3 months). Assemble and frost the cake the day of serving for the best texture and presentation.
Alternatively, if you use the Whipped Cream Buttercream frosting, it can be decorated and frozen, as, despite its name, it's made with shortening, not whipped cream.
❔ Recipe FAQs
Make sure to leave a ½-inch border without filling near the edge and pipe a ring of frosting around the edge to act as a barrier. Ideally, you'll want to let the cake 'settle' overnight before frosting.
Insert a cake tester or toothpick into the center-if it comes out clean or with just a few crumbs, it's done. The edges should also be golden brown and just starting to pull away from the pan.
If you overmix the Saskatoon berries into the batter, the juice can bleed and turn the batter purple. To avoid this, gently fold the berries in just until combined.
You can use 2 (9-inch) round pans, 3 (8-inch) pans, a 9x13, or even one 10-inch pan. For layer cakes, avoid pans that are too shallow, as you want the layers to have a nice height for slicing and filling.
If you are lucky enough to have been Saskatoon berry picking and have fresh Saskatoon berries to use (or have frozen Saskatoons on hand), are looking for Saskatoon cakes, or just want to make something different than the typical pie, give this Saskatoon berry cake a try!
🎂More Summer Cake Recipes
Did your family❤️this recipe? Did you know that commenting and⭐rating recipes is one of the best ways to support your favorite recipe creators? If you LOVED this recipe, please comment and rate it in the recipe card or share photos on social media using the hashtag #foodmeanderings or tagging @foodmeanderings !


📋Saskatoon Berry Layer Cake recipe
Equipment
Ingredients
- 1 cup unsalted butter softened
- 2 cups white granulated sugar
- 4 large eggs (at room temperature) *It's important the eggs are at room temperature
- 1 tablespoon white vinegar
- 1 cup milk * I use 1%
- 1 teaspoon Creme bouquet or Vanilla butter or Princess cake and cookies emulsion *Or substitute 2 teaspoon vanilla extract
- 2 ¾ cups All-purpose flour + 1 tbsp
- 2 ¼ teaspoon baking powder
- ½ teaspoon salt
- 1 ½ cups Saskatoon berries fresh or frozen
- ½ recipe Saskatoon berry pie filling https://foodmeanderings.com/saskatoon-berry-pie-filling-and-sauce/
- 1 recipe whipped cream frosting https://foodmeanderings.com/stabilized-whipped-cream-icing/
Topping/garnish
- sprinkles
- additional Saskatoon berries
Instructions
- Prep: Preheat oven to 350 degrees ( 176 degrees C) and, put oven rack into center of ovenPrepare Saskatoon berry filling *you will only need HALF so you can either make the whole thing and freeze half or make half the recipePrepare Whipped cream frosting½ recipe Saskatoon berry pie filling, 1 recipe whipped cream frosting
Cake
- Add 1 tablespoon vinegar to milk and set aside.1 tablespoon white vinegar, 1 cup milk
- Cream butter and sugar together until fluffy, about 3 minutes.1 cup unsalted butter, 2 cups white granulated sugar
- Add eggs one at a time, beating well after each.Mix the Creme Bouquet (or whatever emulsion you use) into the milk and set aside.4 large eggs (at room temperature), 1 teaspoon Creme bouquet or Vanilla butter or Princess cake and cookies emulsion
- Mix 2 ¾ cup flour, baking powder, and salt together in a separate bowl.2 ¾ cups All-purpose flour + 1 tbsp, 2 ¼ teaspoon baking powder, ½ teaspoon salt
- Add flour mixture to butter/sugar/eggs in two parts, alternating with the milk mixture, beating well after each addition.
- Mix with electric mixer until combined.
- Mix Saskatoon berries with 1 tablespoon of flour.1 ½ cups Saskatoon berries
- Fold Saskatoon berries gently into batter until just combined (don't stir too much or you'll get purple batter)additional Saskatoon berries
- Grease and flour pans (9X13, 3=8″, 2=9″, or 1=10″) * I use Cake Release (affiliate link)
- Divide batter into prepared pans.
- Bake 25 - 40 minutes (depending on the pans you use), or until a cake tester inserted into the center of cake comes out clean.* It took 40 minutes in 2 9 -inch pans for me.
- Let cool in pans 10 minutes,
- Then remove from pans and cool completely on wire rack.
- Slice off any hump on the cake.
- Place cake cut side down on serving plate
Assembly
- Add about 1 ¼ cups whipped cream frosting
- Then add Saskatoon berry filling. *Do not go all the way to the edge or the filling will seep out- leave about ½ an inch, as shown.
- Put the 2nd cake on top (cut side down).
- Frost with whipped cream.
- Continue frosting until the cake is covered.
- Decorate the cake: Add sprinkles, pipe a border around the bottom of the cake, add piping on top, then add berries.How to pipe a border on a cakeHow to pipe decorations on a cakesprinkles
Notes
- Use Cake Release for Easy Removal. For a crumb-free, professional-looking cake, use a generous amount of Cake Release (affiliate link). This ensures the cakes come out of the pans cleanly without sticking or tearing.
- Brush Away Loose Crumbs Before Frosting. Gently use a pastry brush (affiliate link) to remove any loose crumbs before frosting the cake. This helps you achieve a cleaner finish and reduces the chances of crumbs showing through the frosting.
- Prevent Crumbs in Your Frosting. To avoid crumbs mixing into your whipped cream frosting, apply a thick patch of frosting to an area of the cake, then spread it without touching the surface of the cake, and repeat. Here's how to frost a cake without getting crumbs in the frosting! You can also do a thin crumb coat to start
- Do a Crumb Coat (Optional for Extra Neatness). If you want a truly flawless finish, apply a thin layer of frosting over the entire cake (crumb coat) and refrigerate it for 30 minutes before adding the final layer of frosting. This traps stray crumbs and creates a smooth base.
- Toss Berries with Flour First. Mix your Saskatoon berries with a bit of flour before folding them into the batter. This keeps them from sinking to the bottom of the pan during baking and distributes them evenly throughout the cake layers.
- Cool Completely Before Decorating. Always let your cakes cool completely on a wire rack before assembling and decorating. Warm cake layers can melt the frosting and cause it to slide or weep.
- Chill Your Tools and Ingredients for Frosting. For best results when working with whipped cream frosting, chill your mixing bowl and beaters, and keep your frosting cold before decorating. This helps it whip up firmer and hold its shape better during piping and decorating.
- Leave Room for the Filling. When adding the berry filling between the layers, don't spread it all the way to the edge. Leave about a ½-inch border to prevent it from seeping out when you press down the top cake layer.
- Level Your Cakes for Stability. Use a serrated knife or cake leveler to slice off any domed tops from your cake layers so they sit flat. This gives you a more stable cake and cleaner appearance when frosting and slicing.
- Don't Overfill the Pans. Fill your cake pans no more than ⅔ full to avoid overflow and ensure even baking. Overfilled pans can result in domed or sunken centers.
Yes! The cake layers and berry filling can be made and frozen separately ahead of time (for up to 3 months). Assemble and frost the cake the day of serving for the best texture and presentation. Alternatively, if you use the Whipped Cream Buttercream frosting, it can be decorated and frozen, as, despite its name, it's made with shortening, not whipped cream.


Terri Gilson says
My son said this cake made him LOVE Saskatoon berries and he's not even the biggest fan of them!